Author
A high impact bug sometimes needs just one small additional detail before it turns into a practical attack vector. For that reason, when doing vulnerability research, I flag even errors or odd behaviors that look irrelevant at first. In some cases, those findings become the missing puzzle piece of a high-impact vulnerability.
In this article, I describe how seemingly minor bugs helped uncover the full impact of more serious issues. I identified two vulnerabilities in the course of this research:
- CVE-2026-22765 (8.8). A low-privileged attacker with remote access could potentially exploit this vulnerability to escalate privileges.
- CVE-2026-22766 (7.2). A high-privileged attacker with remote access could potentially exploit this vulnerability to achieve remote code execution.
The final step was chaining all discovered vulnerabilities into an exploit chain, which allowed me to achieve unauthenticated remote code execution (RCE) in Dell Wyse Management Suite (On-Prem).

WMS version overview
Before diving into the technical analysis of the vulnerabilities, it helps to clarify the different Dell WMS deployment options. The product is offered in two forms:
- Public cloud, which is hosted in Dell’s infrastructure
- Private cloud (On-Prem), deployed in the customer’s environment; available as a free Standard edition or a paid Pro edition
This research focuses on the On-Prem version.
Business: the fine line between bug and feature
In practice, you cannot build a product that achieves the highest attainable level of security while also delivering the highest attainable level of usability. Even when a feature is carefully designed, you still end up balancing risk against benefit. This is a trade-off that software developers make every day.
Initial entry point: device registration
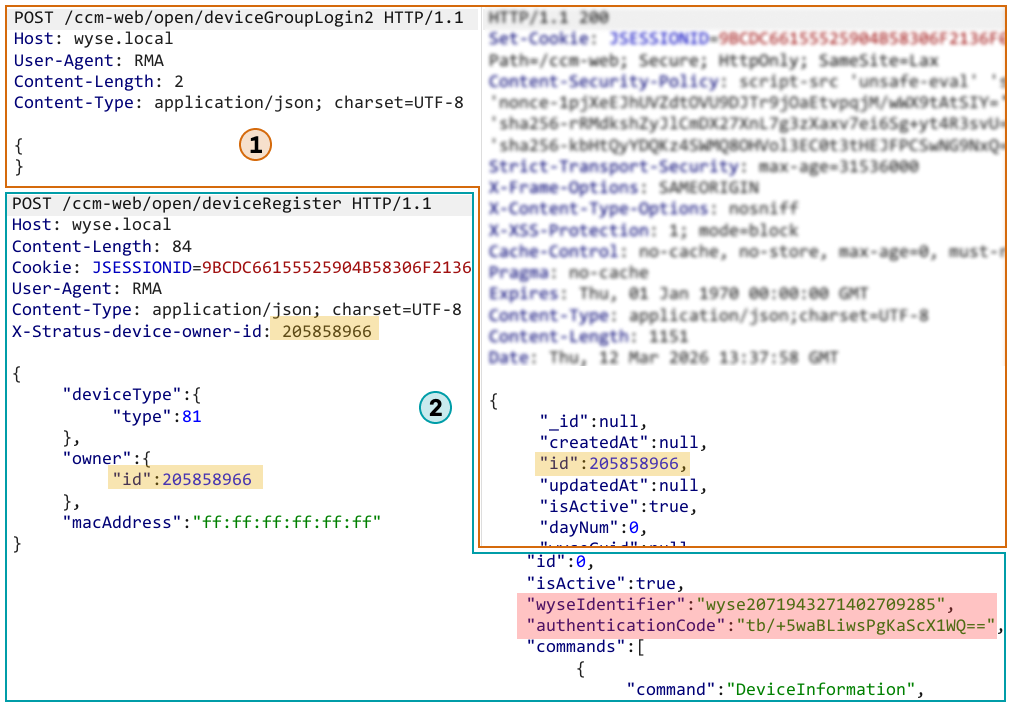
WMS uses device groups to help organize and manage a fleet of thin clients. To register a client into a specific group, you must provide its group token.
Device registration code snippet:
@RequestMapping(...)
@ResponseBody
public Person deviceGroupLogin2(@RequestBody GroupToken token, HttpServletRequest req, HttpServletResponse response) {
    return this.deviceGroupLoginInternal(token, req, response);
}

private Person deviceGroupLoginInternal(GroupToken token, HttpServletRequest req, HttpServletResponse response) {
    ...
    boolean bSpecialQuarantine = false;
    if (token != null && token.getGroupToken() != null && !token.getGroupToken().isEmpty()) {
        ...
    } else { // if group token is empty [3]
        if (!this.publicCloud) { // is On-prem version [1]
            List<TenantEntity> tenants = this.tenantDao.getAllActiveTenants();
            if (tenants.size() == 2) { // default tenants size is 2 [2]
                for (TenantEntity tenant : tenants) {
                    // with the default settings,
                    // the condition for tenant ID=2 is always True.
                    if (!tenant.isSuperTenant()) {
                        // quarantine group [4]
                        userGroup = this.userGroupDao.QuarantineGroupAndUserByTenant(tenant.getId());
                        bSpecialQuarantine = true;
                    }
                }
            }
        }
        ...
        // ... registration logic ...
    }
    ...
}
In the on-premises version [1], the default configuration [2] permits device registration with an empty group token [3]. Such devices are placed into quarantine [4] and receive no configurations until an administrator moves them into another group.
This means that any unauthenticated user can enroll a device into the quarantine group. In the intended security model, a quarantined device should not have any meaningful privileges. However, we will use it as a foothold to advance the attack.
Initiating device group login without a group token and registering the device:
Logic: coloring outside the lines
When creating any functionality, a developer defines its logic. The more complex that logic becomes, the easier it is to break it and force the application to work in the attacker’s favor.
Abusing import logic: creating a new administrator
After registering the device, we received a wyseIdentifier and an authenticationCode. These values can be used to generate a valid request signature, allowing us to call WMS APIs as that device. That gives us additional attack surface to explore.
When I reviewed the routes exposed to device-signed requests, one endpoint immediately stood out: importADUsers. On closer inspection, I found that any registered device can trigger an Active Directory user import.
This is particularly interesting because Dell’s documentation states that Active Directory functionality is only available in the Pro edition, and this specific route is not used in the On-Prem version at all. In practice, however, the Standard edition still appears to leave most AD-related endpoints accessible, and they work when called directly via the API rather than through the Dashboard UI.
As of WMS version 5.5, WMS is aligned with the documented behavior.
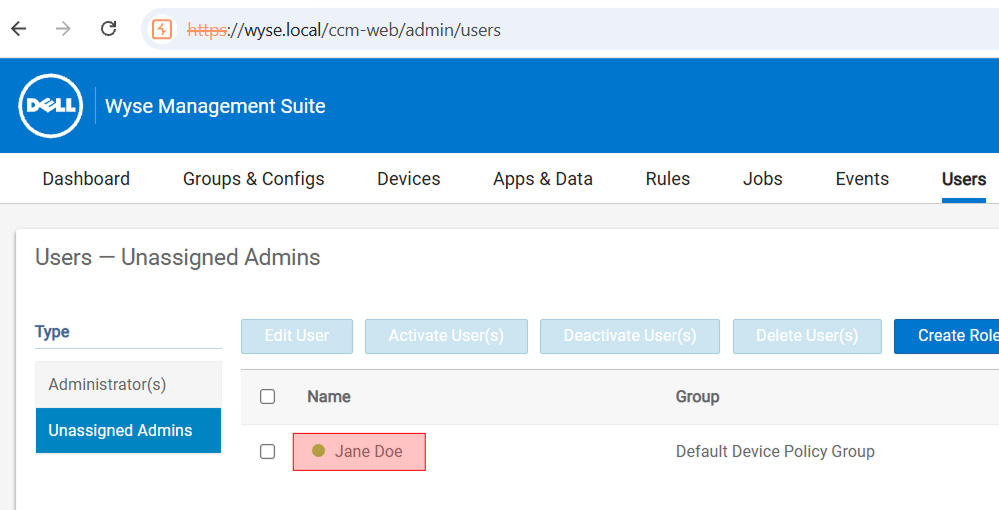
Still, calling the importADUsers route alone was not sufficient. Users imported this way are assigned to the Unassigned Admins group and do not receive effective administrative privileges.
While digging further into the user import workflow, I discovered two additional routes, importADUserGroups and addRoleToADGroup. Both of them are also reachable with nothing more than a valid device signature:
importADUserGroupscreates a new AD-backed role group. If this group is selected during user import, its roles are applied to the imported user.addRoleToADGroupassigns roles to a group created throughimportADUserGroups.
So, to create a fully privileged administrator account, the workflow is:
- Create a new role group via
importADUserGroups. - Grant that group the
Adminrole viaaddRoleToADGroup. - Import an AD user and assign the previously created role group via
importADUsers.
This allows us to provision a new administrator account. But we cannot log in as that user because the password is auto-generated during the import and is not disclosed.

Continuing the attack chain…
Login barrier: two ways around it
At this point, we have created a new administrator account, but we still cannot authenticate as that user. The password is generated and set during the import process, and there seems to be no direct way to retrieve or recover it.
Instead, let’s leverage smaller flaws to move past this limitation. There are two ways to proceed.
Login via password reset
The first way to authenticate is to trigger a password reset and have the new password delivered via email.
This method has two prerequisites:
- SMTP must be configured on the WMS server.
- Outbound emails to external recipients must be permitted.
In real-world deployments, these requirements are usually met. SMTP is typically enabled because it is needed for 2FA, and strict egress filtering for outbound emails to external domains is not very common.
Although the application explicitly blocks password resets for users imported from Active Directory, the restriction is bypassable.
The following snippet shows the AD user check:
public List<String> sendResetPasswordLink(String loginName, String link) throws StratusException {
    LOGGER.info("Sending password link for the user");
    PersonEntity personEntity = this.personDao.getPerson(loginName);
    if (personEntity == null) {
        ...
    } else if (!personEntity.getTenant().getIsActive()) {
        ...
    } else if (this.isADUser(personEntity)) { // AD user check [5]
        LOGGER.info("Password reset not applicable for AD user");
        ...
    } else {
        // sending email with reset code
    }
    ...
}

private boolean isADUser(PersonEntity person) {
    boolean isADUser = false;
    if (!person.getAdUPN().isEmpty() && !person.getAdDomain().isEmpty()) {
        isADUser = true;
    }
    return isADUser; // [6]
}
The code makes it clear that a password reset is only allowed when isADUser [5] returns false [6].
The AdUPN property is not mandatory. When importing via importADUserGroups, it can be empty. This causes the !person.getAdUPN().isEmpty() check to return false, which in turn bypasses the AD user restriction in the password reset flow.
Using this behavior, I imported a new administrator account with an empty AdUPN, set the account’s email address to an external mailbox, and then performed a password reset to obtain a new password and authenticate as the administrator.
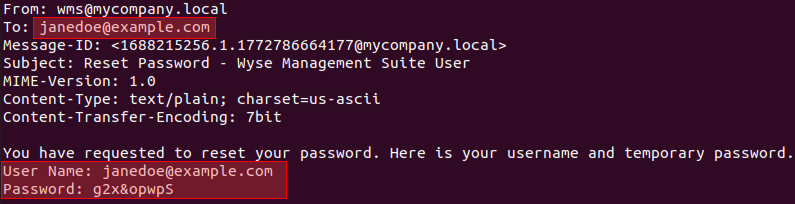
Logged in as the new admin using the password from the email
Login via domain credentials (Pro only)
The second option is to make any compromised AD user an administrator.
To carry out this attack successfully, the attacker needs:
- WMS Pro
- LDAP login configured
- A compromised domain account (with any privileges) and its
objectGUID.
In real-world attacks, it is fairly common to obtain the credentials of some low-privilege domain user. Therefore, this method is not unrealistic.
Why does this work with virtually any account in the configured LDAP domain? The reason is that once the initial validation checks succeed, the application performs the LDAP lookup starting from the domain root. As a result, any user who is permitted to authenticate via LDAP can be allowed to sign in.
When importing the new administrator, the attacker can set the account’s objectGUID and sAMAccountName to the real values of a compromised domain user. From that point on, the auto-generated local password no longer matters: the administrator account can be accessed using the domain credentials via LDAP.
Uploading a JSP shell: bypassing the path traversal filters
At this stage, I was able to authenticate as the administrator account I created earlier, which gave me access to the full WMS feature set.
My first step was to review the parts of the codebase that handle file uploads, looking for a way to upload a JSP web shell. Even when I could influence the destination path, the application still enforced numerous filters intended to block path traversal attempts. In practice, these checks focused on a single traversal pattern: escaping the current directory via .. sequences and similar filename-based variations.
Bypassing path traversal protections by redefining the local repository path:
In the portal settings, there is a File Repository section. These repositories are dedicated content stores (for firmware, images, and so on) used to host and deploy content to Dell Wyse thin clients. During WMS installation, a default repository is created automatically: the local repository. By default, it is located at C:\WMS\LocalRepo.
With administrative privileges, I can send a specially crafted POST request to a hidden endpoint and change the repository’s default path to C:\Program Files\DELL\WMS\Tomcat-10\webapps\ROOT. This directory is Tomcat’s root web application, where JSP rendering is enabled.
After that, any files uploaded to the local repository are written relative to the new base path. At this point, any path traversal filter that validates the uploaded file path becomes useless, and the JSP shell is effectively ready to deploy.
To upload the JSP web shell, I used one of the image upload routes that validates only the MIME type and attempted to upload a .jsp file through it.
However, there was one more obstacle: when the upload path is constructed, the local repository path is cached.
Code snippet responsible for resolving the local repository root path:
...

private ConcurrentHashMap<Long, String> localRepoPath = new ConcurrentHashMap(); // cache holder [7]

...

public String getLocalRepoPath(long tenantId) {
    if (this.publicCloud) {
        return null;
    } else {
        if (this.localRepoPath.get(tenantId) == null) {
            ...
            this.localRepoPath.putIfAbsent(tenantId, ((CcmProxyConfig)config.getEntryBinaryValue()).getOnPremiseUrl()); // [8]
            ...
        }
        return (String)this.localRepoPath.get(tenantId);
    }
}
...
From the code, it is clear that the first time this function runs, it stores the local repository root path in the localRepoPath [7] HashMap and effectively caches it indefinitely [8].
To force the application to pick up the new repository directory, the Tomcat service must be restarted after the path change so that the in-memory cache is cleared. Fortunately, an administrator can do that.
To trigger a restart, an admin simply needs to send a POST request to the relevant endpoint:
@RequestMapping(...)
@ResponseBody
public String saveOnPremiseConfig(@RequestBody ComponentConfiguration data, HttpServletRequest req, HttpServletResponse response) {
...
this.adminFacade.saveOnPremiseConfig(tenant, data);
...
}
...
public void saveOnPremiseConfig(Tenant tenant, ComponentConfiguration data) throws StratusException {
List<OnPremData> config = new ArrayList();
if (data != null) {
...
this.onPremConfiguration.saveOnPremiseAndADConfiguration(
tenant.getId(),
data.getDeviceId(),
config,
adMode,
data.isRestartTomcat() // useful property
);
}
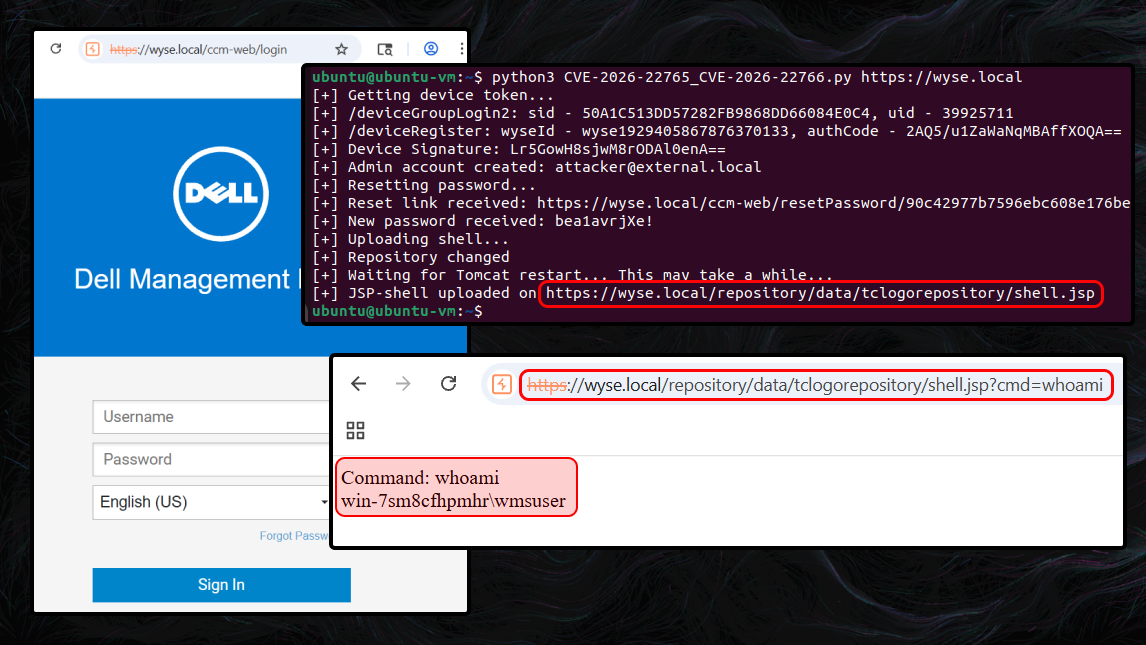
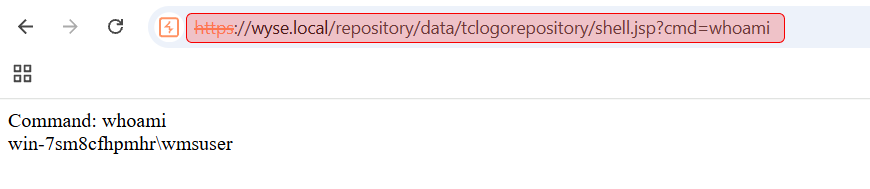
}After changing the local repository path and restarting Tomcat, I uploaded the JSP shell again and was able to execute commands:
Chain: bringing it all together
Each of these bugs is just one link in the chain. However, when combined into a single exploit chain, they produce a massive impact: remote code execution by an unauthenticated attacker.
The takeaway is simple: do not dismiss minor bugs or edge cases. One of them can be the missing link that enables full system compromise. 🙂
Disclosure and Patch Timeline
- Dec 24, 2025 – Initial report submission
- Dec 30, 2025 – Report accepted (confirmation email received from vendor)
- Jan 13, 2026 – Informed the vendor of the full plans for public disclosure of the vulnerabilities (including this write-up).
- Jan 16, 2026 – The vendor confirmed that the vulnerabilities have been accepted for remediation, agreed to credit the researcher in the advisory, and reserved a CVE‑IDs.
- Feb 19, 2026 – The vendor approved the disclosure plans.
- Feb 23, 2026 – Dell Wyse Manager Suite 5.5 released
- Feb 25, 2026 – CVE and advisory published
- Mar 16, 2026 – Mar 20, 2026 – Coordinated with the vendor on this technical write-up describing the findings.
- Mar 23, 2026 – Acknowledgment removed from the advisory by Dell
- Mar 23, 2026 – This write-up published.